How To Photograph Water Drops! Photographing water drops is a captivating and artistic pursuit that allows you to explore the beauty of nature uniquely. The mesmerizing shapes and patterns created by falling drops can result in stunning images that capture the essence of motion and fluidity. In this step-by-step guide, I will walk you through the process of photographing water drops, from setting up your equipment to perfecting your technique. Let’s embark on this creative journey and unlock the secrets of water drop photography.
How To Photograph Water Drops
Here are a few steps on how to photograph water drops:
Step 1: Gather Your Equipment
Before you start capturing water drops, it’s crucial to assemble the right gear. Here’s what you’ll need:
- Camera: Any camera with manual settings is suitable for water drop photography. A DSLR or mirrorless camera is ideal, but even a high-quality smartphone can work wonders.
- Lens: A macro lens is highly recommended for capturing intricate details of water drops up close. However, a standard kit lens or a zoom lens can also be used effectively.
- Tripod: A stable platform is essential to prevent camera shake. Use a sturdy tripod to keep your camera steady during the shoot.
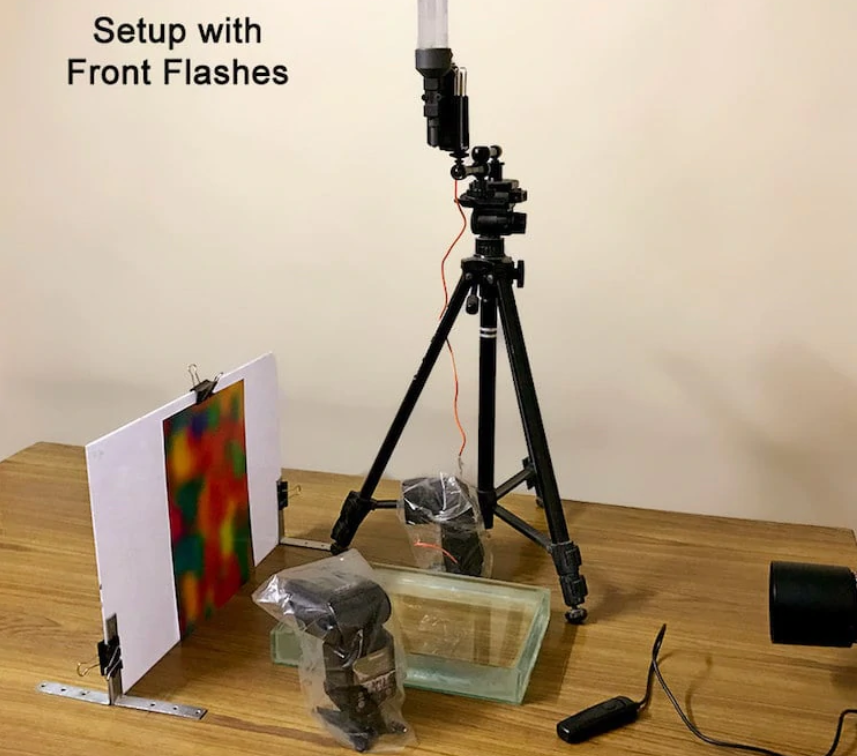
- Remote Shutter Release: This handy accessory minimizes camera shake further by allowing you to trigger the shutter without physically touching the camera.
- Light Source: Adequate lighting is crucial. You can use natural light, artificial light, or a combination of both. Soft, diffused lighting works best to minimize harsh shadows.
- Backdrop: Choose a suitable backdrop to enhance the aesthetics of your water drop images. Consider using coloured paper, fabric, or reflective surfaces like glass or metal.
- Water Dropper: You’ll need a mechanism to release water drops consistently. A simple pipette or an eyedropper works well for this purpose.
Step 2: Set Up Your Shooting Space
Creating the right environment is essential for successful water drop photography. Follow these steps to set up your shooting space:
- Location: Find a clean, clutter-free area where you can work comfortably. Ensure there’s easy access to a water source for refilling.
- Backdrop Placement: Position your chosen backdrop a few inches behind where the water drops will fall. This creates a pleasing background and adds depth to your images.
- Camera Position: Mount your camera on the tripod and compose your shot. Place the camera at the same height as the water dropper for the best results.
- Lighting Setup: Arrange your light source(s) to illuminate the water drops effectively. Experiment with different angles and intensities to achieve the desired effect.
Step 3: Camera Settings
Now that your equipment is in place, it’s time to configure your camera settings for water drop photography:
- Manual Mode: Switch your camera to manual mode to have full control over the exposure settings.
- ISO: Start with a low ISO setting (e.g., ISO 100 or 200) to minimize noise in your images.
- Aperture: Use a narrow aperture (e.g., f/8 to f/16) to maximize depth of field. A smaller aperture ensures that both the water drops and their splashes are in focus.
- Shutter Speed: Set a relatively fast shutter speed (e.g., 1/200 or faster) to freeze the motion of the water drops. The exact speed may vary based on your lighting conditions and the speed of the drops.
Step 4: Focus and Composition
Achieving sharp focus and composing your shot effectively are critical aspects of water drop photography:
- Manual Focus: Switch to manual focus to ensure that the water drops are sharp and crisp in your images. Focus on the area where the drops will fall.
- Composition: Experiment with different compositions and angles. Consider the rule of thirds, leading lines, and symmetry to create visually engaging photographs.
Step 5: Timing and Dropper Control
The heart of water drop photography lies in precise timing and control. Here’s how to master this aspect:
- Dropper Timing: Experiment with the timing and rhythm of releasing the water drops. You can manually release the drops or use a dropper stand to control the timing more precisely.
- Continuous Shooting: Switch to continuous shooting mode (burst mode) to increase your chances of capturing the perfect moment when the water drops collide or create intricate patterns. { "@context": "https://schema.org/", "@type": "HowTo", "name": "How To Photograph Water Droplets", "description": "Photographing water droplets is a great way to capture the natural beauty of water. With the right photography equipment and techniques, you can create stunning images that show the individual water droplets and the water itself.", "image": "https://photolightboxes.net/wp-content/uploads/2022/05/How-To-Photograph-Water-Drops-2-1024x664.png", "totalTime": "PT10M", "estimatedCost": { "@type": "MonetaryAmount", "currency": "USD", "value": "5$" }, "supply": [ { "@type": "HowToSupply", "name": "tripod" } ], "tool": [ { "@type": "HowToTool", "name": "digital SLR camera" } ], "step": [ { "@type": "HowToStep", "text": "Water droplets can be fascinating subjects for photography, but capturing them can be a challenge. There are a few settings you can use to get the best results. One is to use a low aperture, such as f/22, to create a large depth of field and keep the entire droplet in focus. You can also try using a fast shutter speed to freeze the action. If you want to capture the motion of the water droplets, try using a slow shutter speed instead. Experiment with different combinations of settings to see what works best for your particular shot.", "image": "https://photolightboxes.net/wp-content/uploads/2022/05/How-To-Photograph-Water-Drops-2-1024x664.png", "name": "CAMERA SETTINGS FOR PHOTOGRAPHING WATER DROPLETS", "url": "https://photolightboxes.net/how-to-photograph-water-drops/#Camera_Settings_for_Photographing_Water_Droplets" }, { "@type": "HowToStep", "text": "Water droplets are beautiful and delicate objects that can be photographed in a variety of ways to create interesting and unique images. In order to get the most out of photographing water droplets, it is important to understand how positioning and lighting can be used to your advantage.", "image": "https://photolightboxes.net/wp-content/uploads/2022/05/How-To-Photograph-Water-Drops-2-1024x664.png", "name": "POSITIONING AND LIGHTING FOR PHOTOGRAPHING WATER DROPLETS", "url": "https://photolightboxes.net/how-to-photograph-water-drops/#Positioning_and_Lighting_for_Photographing_Water_Droplets" }, { "@type": "HowToStep", "text": "When photographing water droplets, it’s important to have the right props and backdrops. Here are a few things to consider:\n\nChoose a background that contrasts with the color of the droplets. A dark background will make light droplets stand out, while a light background will make dark droplets stand out.\nUse props to add interest to your photos. For example, you can use leaves, flowers, or other objects to create a scene.\nMake sure the surface is smooth and clean. Dirty or rough surfaces can cause the droplets to bounce around and create an unappealing photo.\nExperiment with different angles and lighting effects to create unique photos.", "image": "https://photolightboxes.net/wp-content/uploads/2022/05/How-To-Photograph-Water-Drops-2-1024x664.png", "name": "PROPS AND BACKDROPS FOR PHOTOGRAPHING WATER DROPLETS", "url": "https://photolightboxes.net/how-to-photograph-water-drops/#Props_and_Backdrops_for_Photographing_Water_Droplets" }, { "@type": "HowToStep", "text": "The best way to capture water droplets is to use a macro lens and a tripod. For the best results, you should also use a remote shutter release or the camera’s timer function. Position your camera so that the light is behind you and shining on the water droplets. If possible, use a backlight to create interesting effects. Experiment with different angles and compositions until you find one that you like. Make sure that your shutter speed is slow enough to capture the motion of the droplets.", "image": "https://photolightboxes.net/wp-content/uploads/2022/05/How-To-Photograph-Water-Drops-2-1024x664.png", "name": "TIPS FOR GETTING THE PERFECT SHOT WATER DROPLETS", "url": "https://photolightboxes.net/how-to-photograph-water-drops/#Tips_for_Getting_the_Perfect_Shot_Water_Droplets" } ] }
Step 6: Review and Refine
After capturing your shots, review them on your camera’s LCD screen. Pay attention to the composition, focus, and timing. Make necessary adjustments, whether it’s fine-tuning the lighting or experimenting with different dropper release patterns.
Step 7: Advanced Techniques (Optional)
Once you’ve mastered the basics, you can explore advanced techniques to elevate your water drop photography:
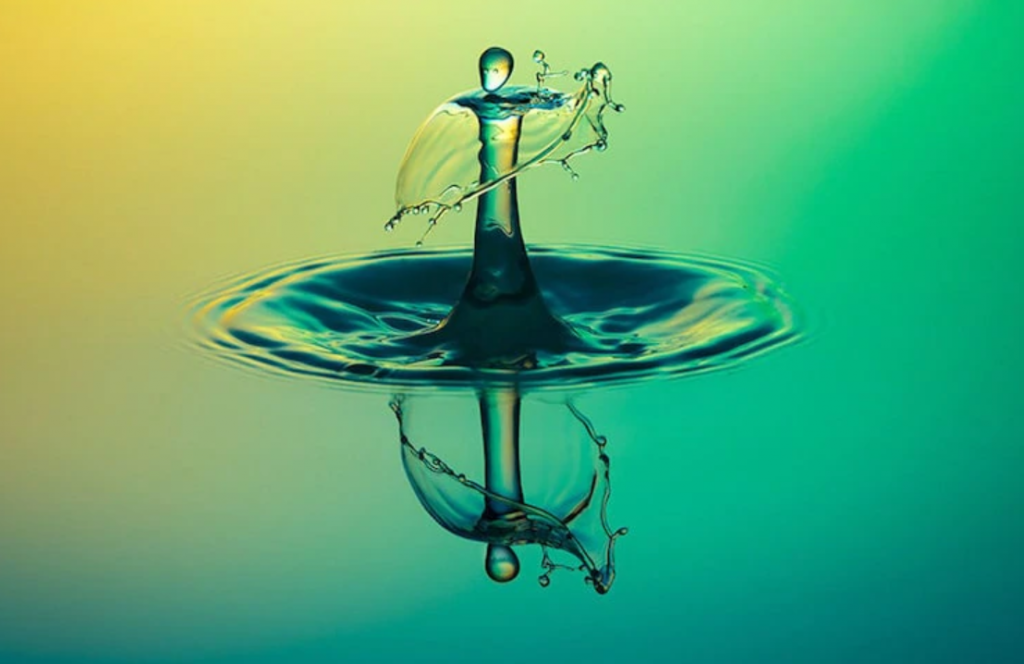
- Colour Effects: Experiment with coloured gels or filters on your lighting source to create captivating colour effects on the water drops.
- Reflections and Refractions: Place small objects or colourful items behind the water drops to create intriguing refraction and reflection effects.
- Multiple Drops: Challenge yourself by capturing multiple water drops in a single frame, creating intricate patterns and compositions.
Conclusion
Photographing water drops is a mesmerizing and creative endeavour that allows you to explore the fluidity of nature uniquely. By following this step-by-step guide and experimenting with various techniques, you’ll be well on your way to capturing stunning images that showcase the intricate beauty of water drops. So, grab your camera, set up your shooting space, and embark on this captivating photographic journey.


