How to Make a Photo Light Tent! Are you tired of taking mediocre photos of your products? Do you want to enhance the quality of your images without breaking the bank? Look no further – we will show you how to make a photo light tent that will revolutionize your photography game in this article. With just a few simple materials and some easy-to-follow steps, you can create stunning, professional-looking product photos that will catch potential customers’ eye. Say goodbye to dull, poorly lit images and hello to vibrant, well-lit photographs that showcase your products in their best light. { "@context": "https://schema.org/", "@type": "HowTo", "name": "How to Make a Photo Light Tent", "description": "How to Make a Photo Light Tent! A light tent is like a custom-made mini studio where you can create the perfect setting for your portraits. This square or rectangle fixture features semi-transparent white walls lined with diffusion material, which allows in more flattering soft lighting as well as diffusing it so that all parts are shaded evenly without any harsh shadows on faces or objects within view (which would give too much contrast).", "image": "https://photolightboxes.net/how-to-make-photo-light-tent/", "totalTime": "PT10M", "estimatedCost": { "@type": "MonetaryAmount", "currency": "USA", "value": "$10" }, "supply": [ { "@type": "HowToSupply", "name": "Rigid cardboard box" }, { "@type": "HowToSupply", "name": "Marker" } ], "tool": [ { "@type": "HowToTool", "name": "Cutting board" }, { "@type": "HowToTool", "name": "Semi-transparent white paper" }, { "@type": "HowToTool", "name": "Tape" } ], "step": [ { "@type": "HowToStep", "text": "Rigid cardboard box \nMarker \nTough scissors\nCutting board \nSemi-transparent white paper \nTape", "image": "https://photolightboxes.net/wp-content/uploads/2021/11/Materials-1-1.png", "name": "Materials", "url": "https://photolightboxes.net/how-to-make-photo-light-tent/#Step_1_Materials" }, { "@type": "HowToStep", "text": "You’ll need a cardboard box of the appropriate size for your project. You can choose between small, medium, or large depending on how big it is going to be when finished with this craft!", "image": "https://photolightboxes.net/wp-content/uploads/2021/11/Prepare-the-Box.png", "name": "Prepare the Box", "url": "https://photolightboxes.net/how-to-make-photo-light-tent/#Step_2_Prepare_the_Box" }, { "@type": "HowToStep", "text": "Measure the distance from the top and sides of your box. The goal is to create a window as large on these three sides, but not so long that it damages or weakens them in any way.\n\nThe marker should be short enough so you can see what’s going on inside while still maintaining structural integrity for stability\n\nTo make sure you don't cut any of your cuts too close, I've placed my guidelines at 6 cm for the weakest part (the edge where flaps were) and 5 cm elsewhere. If using a utility knife to remove the top and sides then mark lines inside the box first!", "image": "https://photolightboxes.net/wp-content/uploads/2021/11/Measure-the-Windows.png", "name": "Measure the Windows", "url": "https://photolightboxes.net/how-to-make-photo-light-tent/#Step_3_Measure_the_Windows" }, { "@type": "HowToStep", "text": "To create a cut that is sure to be well-made, you will have to use your tough scissors and follow the instructions outlined in it. If there are any lines inside the box, then you should use another blade with a cutting board or another pair of hands to use when using a utility knife without one; metal is best for the circumstances because it makes it safer and easier to use.", "image": "https://photolightboxes.net/wp-content/uploads/2021/11/Cut-Out-the-Windows.png", "name": "Cut Out the Windows", "url": "https://photolightboxes.net/how-to-make-photo-light-tent/#Step_4_Cut_Out_the_Windows" }, { "@type": "HowToStep", "text": "If you want your windows to look like elegant and expensive glass, go for it! To do this we will need some materials that can be found at any home improvement store. Take the semi-transparent white paper from a roll or stack if available; tracing paper also works well in making sure there’s enough width when measuring each piece size needed per window's dimensions (i.e., length x height). If possible - measure one long strip of material which covers all three sections' needs onto ready space without overlapping parts along surface area covered by original [background color].", "image": "https://photolightboxes.net/wp-content/uploads/2021/11/Measure-and-Cut-the-Paper-for-Windows.png", "name": "Measure and Cut the Paper for Windows", "url": "https://photolightboxes.net/how-to-make-photo-light-tent/#Step_5_Measure_and_Cut_the_Paper_for_Windows" }, { "@type": "HowToStep", "text": "With the paper fitting inside of this box, put it in the location and tape the paper.", "image": "https://photolightboxes.net/wp-content/uploads/2021/11/Attach-the-Paper.png", "name": "Attach the Paper", "url": "https://photolightboxes.net/how-to-make-photo-light-tent/#Step_6_Attach_the_Paper" }, { "@type": "HowToStep", "text": "To make your photoshoot go more smoothly, tape a paper template to the back of the box. This will allow you to position everything correctly and prevent any unwanted tilts or curves from occurring during setup time! When positioning items inside take care not only about their placement on top but also lower shelves too - if anything is hanging off its edge it could create an unflattering image in photos (not one we want!). Once finished simply stand upright after closing up shop with these simple steps.", "image": "https://photolightboxes.net/wp-content/uploads/2021/11/Attach-the-Runway.png", "name": "Attach the Runway", "url": "https://photolightboxes.net/how-to-make-photo-light-tent/#Step_7_Attach_the_Runway" }, { "@type": "HowToStep", "text": "When a new tent's light enters the area, you should modify the lighting of the room to maximize success and comfort. To improve your ability to watch and enjoy a show of this size in addition to the signs of light, you should adjust your location to accommodate those that get satisfactory sunlight or move to a different location if appropriate.", "image": "https://photolightboxes.net/wp-content/uploads/2021/11/Position-the-Tent.png", "name": "Position the Tent", "url": "https://photolightboxes.net/how-to-make-photo-light-tent/#Step_8_Position_the_Tent" }, { "@type": "HowToStep", "text": "To get the most out of your photo, it's important to be strategic about positioning. Make sure you place your craft in between two stakes with an open space around them so there are no obstacles for viewers when they view this art form up close! Keeping away from back curves will keep everything looking seamless while still maintaining that raw feel we're going after here today.", "image": "https://photolightboxes.net/wp-content/uploads/2021/11/Position-Your-Craft.png", "name": "Position Your Craft", "url": "https://photolightboxes.net/how-to-make-photo-light-tent/#Step_8_Position_the_Tent" } ] }
How to Make a Photo Light Tent
A photo-light tent is a great way to take high-quality photos of small objects. It is easy to set up and use and only requires a few household items. Here is how to make your own photo light tent.
Step 1: Materials
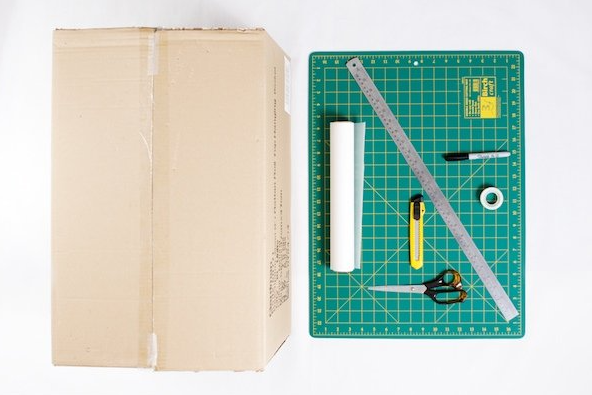
- Rigid cardboard box
- Marker
- Tough scissors
- Cutting board
- Semi-transparent white paper
- Tape
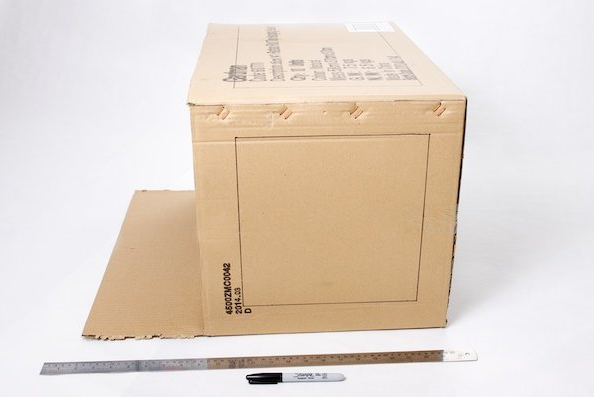
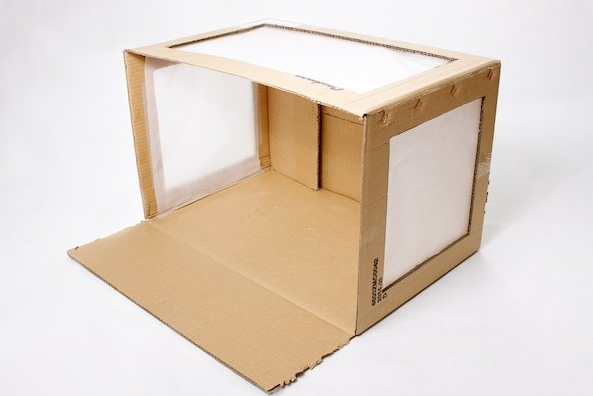
Step 2: Prepare the Box
You’ll need a cardboard box of the appropriate size for your project. You can choose between small, medium, or large depending on how big it is going to be when finished with this craft!

The larger the box, the lighter it will contain. The more light bouncing around inside your setting means that you’ll have a brighter and lovelier ambiance for all to enjoy!
Inside my box of 60 by 40 by 35 cm, I removed three flaps from the top and bottom to leave only the top flap, which will fold down as an extension for my base.
Step 3: Measure the Windows
Measure the distance from the top and sides of your box. The goal is to create a window as large on these three sides, but not so long that it damages or weakens them in any way.
The marker should be short enough so you can see what’s going on inside while still maintaining structural integrity for stability
To make sure you don’t cut any of your cuts too close, I’ve placed my guidelines at 6 cm for the weakest part (the edge where the flaps were) and 5 cm elsewhere. If using a utility knife to remove the top and sides then mark lines inside the box first!
Step 4: Cut Out the Windows
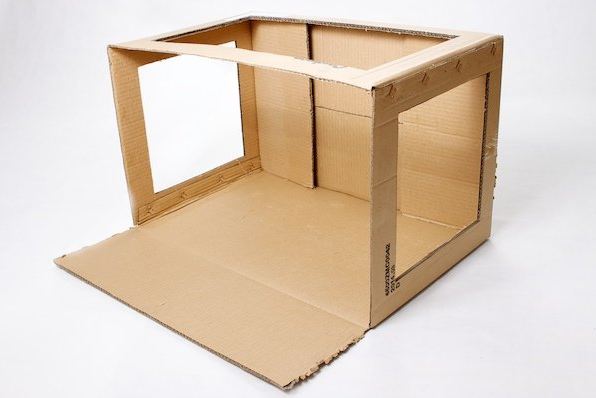
To create a cut that is sure to be well-made, you will have to use your tough scissors and follow the instructions outlined in it. If there are any lines inside the box, then you should use another blade with a cutting board or another pair of hands to use when using a utility knife without one; metal is best for the circumstances because it makes it safer and easier to use.
Use tools safely (Hint hint!)
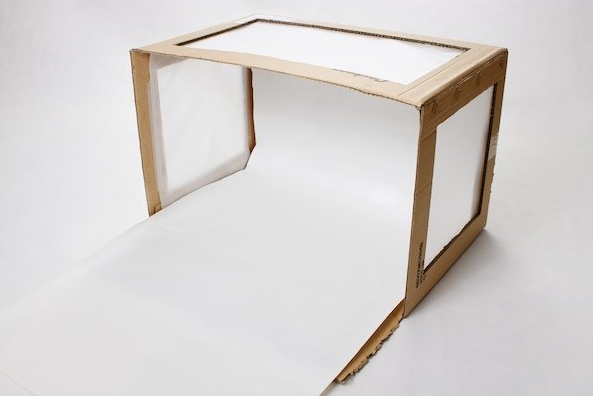
Step 5: Measure and Cut the Paper for Windows
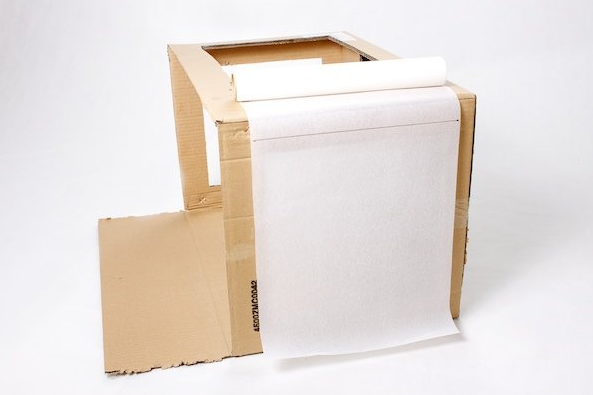
If you want your windows to look like elegant and expensive glass, go for it! To do this we will need some materials that can be found at any home improvement store. Take the semi-transparent white paper from a roll or stack if available; tracing paper also works well in making sure there’s enough width when measuring each piece size needed per window’s dimensions (i.e., length x height). If possible – measure one long strip of material which covers all three sections’ needs onto ready space without overlapping parts along the surface area covered by the original [background color].
Step 6: Attach the Paper
With the paper fitting inside of this box, put it in the location and tape the paper.
Step 7: Attach the Runway
To make your photo shoot go more smoothly, tape a paper template to the back of the box. This will allow you to position everything correctly and prevent any unwanted tilts or curves from occurring during setup time! When positioning items inside take care not only about their placement on top but also on lower shelves too – if anything is hanging off its edge it could create an unflattering image in photos (not one we want!). Once finished simply stand upright after closing up shop with these simple steps.
Step 8: Position the Tent
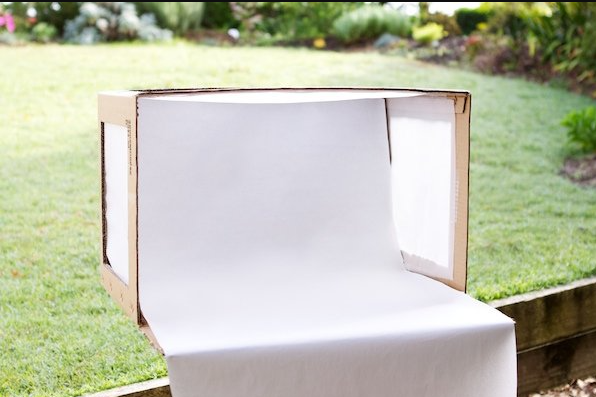
When a new tent’s light enters the area, you should modify the lighting of the room to maximize success and comfort. To improve your ability to watch and enjoy a show of this size in addition to the signs of light, you should adjust your location to accommodate those that get satisfactory sunlight or move to a different location if appropriate.
Step 9: Position Your Craft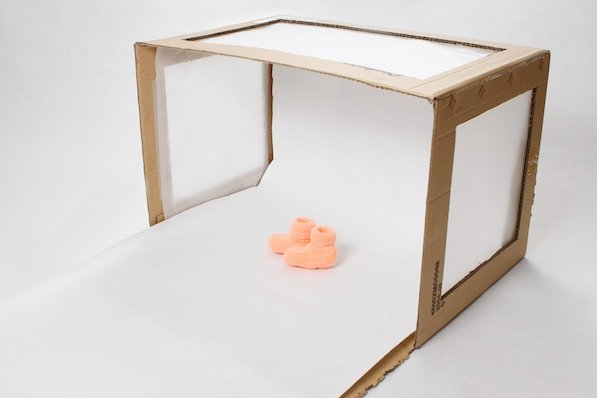
To get the most out of your photo, it’s important to be strategic about positioning. Make sure you place your craft in between two stakes with an open space around them so there are no obstacles for viewers when they view this art form up close! Keeping away from back curves will keep everything looking seamless while still maintaining that raw feel we’re going after here today.
Now, Start Shooting!
Now you can make your own light tent! It’s easy, and it looks great.
Conclusion
In conclusion, creating a photo light tent is a simple and cost-effective way to improve the quality of your product photography. Following the steps outlined in this article, you can easily construct a light tent using materials readily available at home or at your local craft store. Not only will this help eliminate harsh shadows and reflections from your images, but it will also provide a consistent and professional-looking backdrop for your products. So why wait? Start building your photo light tent today and take your product photography to the next level!


