How to Create a Phone Tripod! A tripod is The best way to hold your smartphone steadily while taking pictures or movies. Although many types of tripods exist, most individuals need to be more enthused about dragging around their pricey photographic gear only to take a picture with their smartphone.
Are you sick of taking pictures with your phone and making them blurry? What about jerky videos that cause vertigo? We have the answer, though: How to Build a Phone Tripod. This article will demonstrate making a tripod from three common household materials. You can quickly and affordably take better photos and movies whenever you pick up your phone.
How to Make a Tripod for Your Phone
How can a phone tripod be created? Here are a few easy steps!
Step#1: Find a sturdy plastic cap
It would help if you stayed away from caps that are already bending because the pressure of your iPhone forces them to do so. The lids should be thicker and more robust, so there is less chance of failure here, but watch out!
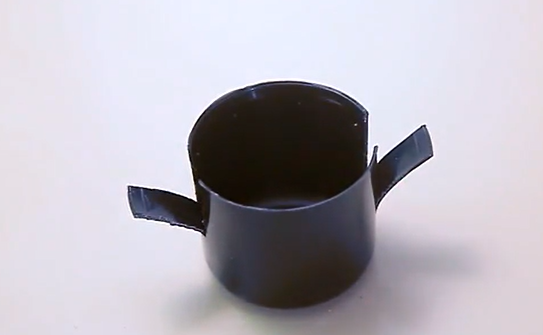
Step#2: Cut the cap vertically twice
Make clean cuts down the cap’s edges, spaced roughly 5 mm apart, after carefully measuring and marking your cutting area.

You’ll want it halfway through to ensure enough left over to attach on top. Since most users will only be sawing off about 1 inch at a time anyway, 10 MM broad cuts are best for iPhones over five years old (iPhone 3Gs) to improve strength while building with their small screens in mind.
Step#3: Rotate the cap 180 degrees
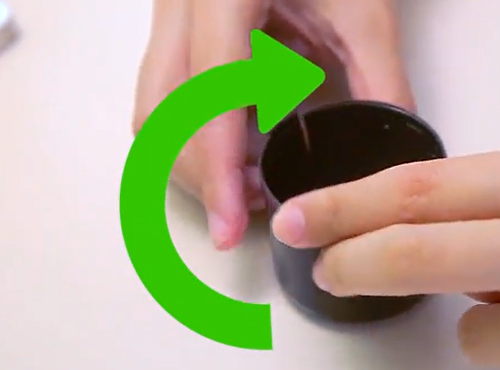
Holding the cap with the cuts you made on the other side is proper now.
Step#4: Cut the cap again
It will resemble the cuts you created in Step 2 in some ways.
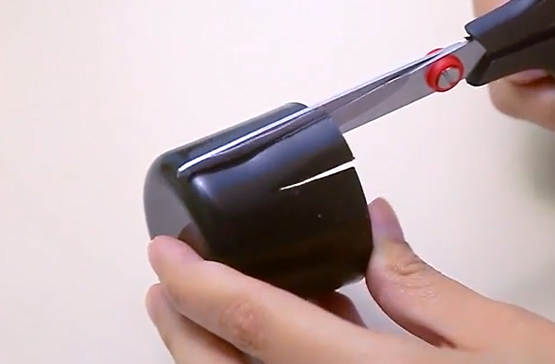
Attempt to maintain equal spacing between each of the four cuts. Your phone could tremble in the stand or slip out of its grip if one side is sliced more barely.
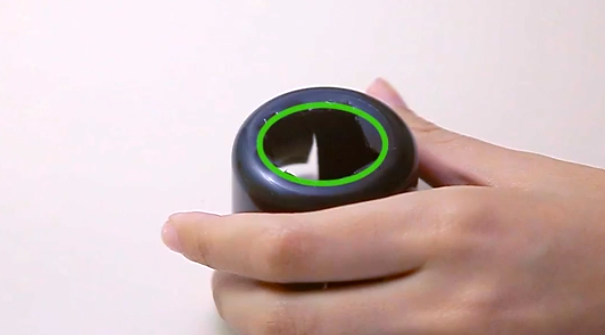
Step#5: Push the 2 flaps far from each different
Pulling the folds as far down as possible completes the task.
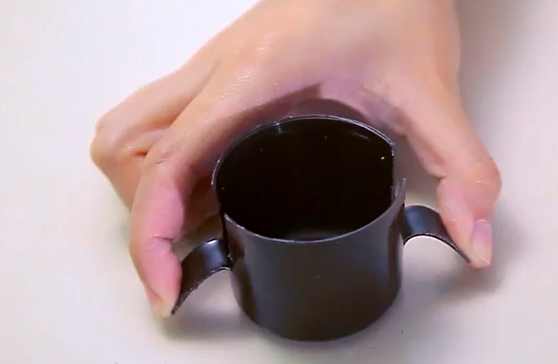
Separate the two flaps by pushing them apart.The plastic will become permanently wrinkled as a result.
Be careful not to sever the cap’s folds because you’ll need them to help set your phone down.
Step#6: Release the flaps from your grip
By doing so, they will return to a position that is almost level, increasing the sound quality of your phone.
If you require the flexibility to point your camera either up or down, repeat the above method with calculated cuts of 30 degrees.
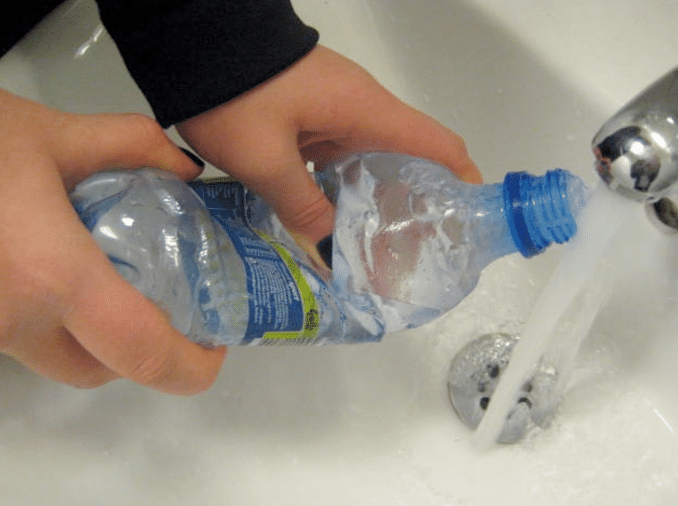
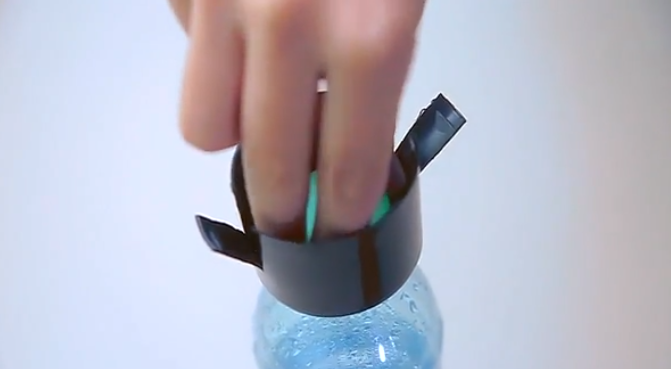
Step#7: Get an unfilled water bottle

Step#8: Cut an opening in the lower part of the cap
Make a hole in the cap’s base.It should be the same size as a plastic water bottle’s mouthpiece.
Step#9: Fill the bottle with water
Step#10: Push the container mouth through the tough spray cap
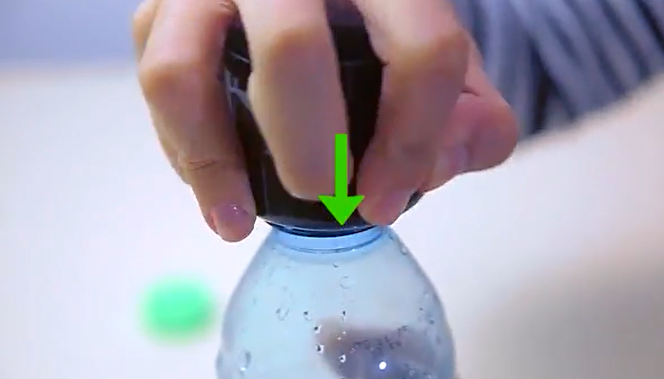
Step#11: The tripod is secure again
The tripod is once more stable.Even though the tripod is once again stable, you should reattach the water bottle top just in case.
Conclusion
In conclusion, making a tripod for your phone is a simple and cost-effective way to improve the quality of your photos and videos. With just a few household items and some basic tools, you can create a stable and adjustable tripod that will give you steady shots every time. Whether you’re an amateur photographer or a social media enthusiast, having a tripod for your phone will undoubtedly enhance your content creation experience. So why wait? Grab those materials and get started on building your very own tripod today! Your photos and videos will thank you. { "@context": "https://schema.org/", "@type": "HowTo", "name": "How to Make a Tripod for Your Phone", "description": "A tripod is a great way to hold your smartphone steady for taking photos or videos. There are many different kinds of tripods available, but most people aren’t that excited about carrying around their expensive camera equipment just to take a picture with their cell phone. Tired of getting blurry photos when you take a picture with your phone? How about shaky videos that make people dizzy? Well, we have the solution: How to Make a Tripod for Your Phone. This post will show you how to craft a tripod from three items found around the house. It is an easy and cost-effective way to get better pictures and videos each time you pick up your phone!", "image": "https://photolightboxes.net/wp-content/uploads/2022/01/Find-a-sturdy-plastic-cap.png", "totalTime": "PT10M", "estimatedCost": { "@type": "MonetaryAmount", "currency": "USD", "value": "5$" }, "supply": [ { "@type": "HowToSupply", "name": "bottle" } ], "tool": [ { "@type": "HowToTool", "name": "glue" } ], "step": [ { "@type": "HowToStep", "text": "The pressure of your iPhone is what causes the caps to bend, so you should avoid those that are already flexing. It’s best if the caps are a little thicker and rigid because then there will be less risk for failure in this area – but beware!", "image": "https://photolightboxes.net/wp-content/uploads/2022/01/Find-a-sturdy-plastic-cap.png", "name": "FIND A STURDY PLASTIC CAP", "url": "https://photolightboxes.net/how-to-make-a-tripod-for-your-phone/#Step1_Find_a_sturdy_plastic_cap" }, { "@type": "HowToStep", "text": "After you’ve carefully measured and marked out your cutting area, make a clean cut approximately 5mm apart down the sides of the cap. \n\nCut the cap vertically twice\n\nYou’ll want it halfway through so that there is plenty left over to glue on top! For iPhones pre-5 year models (iPhone 3Gs), 10 MM wide cuts are best for better strength when designing with their small screens in mind – especially since most people won’t be sawing off any more than about 1 inch at once anyway.", "image": "https://photolightboxes.net/wp-content/uploads/2022/01/Cut-the-cap-vertically-twice.png", "name": "CUT THE CAP VERTICALLY TWICE", "url": "https://photolightboxes.net/how-to-make-a-tripod-for-your-phone/#Step1_Cut_the_cap_vertically_twice" }, { "@type": "HowToStep", "text": "You should now hold the cap with the cuts you just made on its contrary side.", "image": "https://photolightboxes.net/wp-content/uploads/2022/01/Rotate-the-cap-.png", "name": "ROTATE THE CAP 180 DEGREES", "url": "https://photolightboxes.net/how-to-make-a-tripod-for-your-phone/#Step1_Rotate_the_cap_180_degrees" }, { "@type": "HowToStep", "text": "It will be similar sort of the cuts you made in Step 2.\n\nAttempt to keep every one of the 4 cuts’ equivalent distances separated. Assuming one side is cut more barely than another, your telephone might shake while sitting in the stand or get out of its hold.", "image": "https://photolightboxes.net/wp-content/uploads/2022/01/Cut-the-cap-again.png", "name": "CUT THE CAP AGAIN", "url": "https://photolightboxes.net/how-to-make-a-tripod-for-your-phone/#Step1_Cut_the_cap_again" }, { "@type": "HowToStep", "text": "This is finished by pulling the folds down to the extent that they will go.\n\n\nIt will make a long-lasting wrinkle in the plastic.\n\nBe mindful so as not to sever the folds of the cap – you’ll utilize them to assist with settling your telephone.", "image": "https://photolightboxes.net/wp-content/uploads/2022/01/Push-the-2-flaps-far-from-each-different.png", "name": "PUSH THE 2 FLAPS FAR FROM EACH DIFFERENT", "url": "https://photolightboxes.net/how-to-make-a-tripod-for-your-phone/#Step1_Push_the_2_flaps_far_from_each_different" }, { "@type": "HowToStep", "text": "In the event that you need the choice of having the option to point your camera to shoot up or down, rehash the means above with 30 degree calculated cuts.", "image": "https://photolightboxes.net/wp-content/uploads/2022/01/Release-the-flaps-from-your-grip.png", "name": "RELEASE THE FLAPS FROM YOUR GRIP", "url": "https://photolightboxes.net/how-to-make-a-tripod-for-your-phone/#Step1_Release_the_flaps_from_your_grip" }, { "@type": "HowToStep", "text": "", "image": "https://photolightboxes.net/wp-content/uploads/2022/01/Get-an-unfilled-water-bottle.png", "name": "GET AN UNFILLED WATER BOTTLE", "url": "https://photolightboxes.net/how-to-make-a-tripod-for-your-phone/#Step1_Get_an_unfilled_water_bottle" }, { "@type": "HowToStep", "text": "", "image": "https://photolightboxes.net/wp-content/uploads/2022/01/Cut-a-hole-in-the-bottom-of-the-cap.png", "name": "CUT AN OPENING IN THE LOWER PART OF THE CAP", "url": "https://photolightboxes.net/how-to-make-a-tripod-for-your-phone/#Step1_Cut_an_opening_in_the_lower_part_of_the_cap" }, { "@type": "HowToStep", "text": "", "image": "https://photolightboxes.net/wp-content/uploads/2022/01/Fill-the-bottle-with-water.png", "name": "FILL THE BOTTLE WITH WATER", "url": "https://photolightboxes.net/how-to-make-a-tripod-for-your-phone/#Step1_Fill_the_bottle_with_water" }, { "@type": "HowToStep", "text": "", "image": "https://photolightboxes.net/wp-content/uploads/2022/01/Push-the-bottle-mouth-through-the-sturdy-aerosol-cap.png", "name": "PUSH THE CONTAINER MOUTH THROUGH THE TOUGH SPRAY CAP", "url": "https://photolightboxes.net/how-to-make-a-tripod-for-your-phone/#Step1_Push_the_container_mouth_through_the_tough_spray_cap" }, { "@type": "HowToStep", "text": "The tripod is secure again, but you might want to screw back on that water bottle cap just in case.", "image": "https://photolightboxes.net/wp-content/uploads/2022/01/The-tripod-is-secure-again.png", "name": "THE TRIPOD IS SECURE AGAIN", "url": "https://photolightboxes.net/how-to-make-a-tripod-for-your-phone/#Step1_The_tripod_is_secure_again" } ] }
Note: Interested to know about Beginning Photography Equipment?
Frequently Asked Questions
Q1: What can I use if I don’t have a phone tripod?
A1: If you don’t have a phone tripod, you can improvise by using everyday items like books, a stack of sturdy objects, or a stable surface like a table or shelf to prop up your phone. Be creative and find a stable support that keeps your phone steady for photography or recording.
Q2: How do you make a tall tripod for your phone?
A2: To make a tall tripod for your phone, use an extendable selfie stick or monopod, attach a phone holder to the top, and adjust the height to your liking. Place the assembly on a stable surface or use additional items like books to increase the height if needed. This setup provides a tall and adjustable tripod for your phone.
Q3: How do you make a homemade phone stand?
A3: To make a homemade phone stand, you can use common household items like a binder clip, a cardboard tube, or even a folded paperclip. Simply shape these materials to hold your phone at a comfortable viewing angle on a flat surface, creating a DIY phone stand for hands-free use.
Q4: How do you make a selfie tripod?
A4: To make a selfie tripod, attach a phone holder or mount to the top of a selfie stick or extendable monopod. Extend the stick to your desired height and angle, providing stability for hands-free selfie photography or video recording.


