Jewelry Photography Lighting Setup! In jewelry photography, one wants to capture the jewelry as close to true color as possible. This can be a challenge When photographing jewelry we also want it to look like there is nice clean light all around, not too dark or too bright however since we often use flash we obviously need some control over it. The main purpose of jewelry photography lighting setup is to take away shadows and provide both even background lighting and focus on the jewelry itself.
No matter what type of jewelry photography you do, there are a few key pieces of lighting that will help bring out the details and colors in your subjects’ pieces. In this article, we’ll outline the basic lighting setup for jewelry photography, including tips on where to place your light sources and how to adjust them to achieve the look you’re going for. { "@context": "https://schema.org/", "@type": "FAQPage", "mainEntity": [ { "@type": "Question", "name": "HOW DO YOU TAKE GOOD PICTURES OF JEWELRY?", "acceptedAnswer": { "@type": "Answer", "text": "Knowing the proper way to take a picture with your camera is through knowledge of macro lenses, tripods, and lights. When you are taking this type of photo make sure everything from the lighting sources down will be in focus so it’s not hard on viewers’ eyes when viewing these types of photos online or printing them at home!" } }, { "@type": "Question", "name": "WHAT IS THE BEST COLOR TO SHOW OFF JEWELRY?", "acceptedAnswer": { "@type": "Answer", "text": "When it comes to showing off jewelry, there is no one definitive answer as to what the best color is. However, certain colors are better suited for certain types of jewelry than others. For example, gold and silver jewelry look great against black clothing, while red complements green outfits nicely. In general, though, brighter colors tend to work better when showing off jewelry. This is because they create a more striking visual contrast and draw attention to the pieces being worn. Jewelry in shades of blue, pink, or purple is all great options for making a statement." } }, { "@type": "Question", "name": "HOW DO YOU PHOTOGRAPH JEWELRY IN NATURAL LIGHT?", "acceptedAnswer": { "@type": "Answer", "text": "The first step is to find a place where there is natural light. A window is a good place to photograph jewelry because it provides soft natural light. If you are using an iPhone or other mobile device, move your subject close to a window. If you are using a DSLR camera, set your camera to aperture priority mode and select an aperture of f/5.6 or higher." } }, { "@type": "Question", "name": "WHAT IS THE BEST LIGHTING FOR JEWELRY PHOTOGRAPHY?", "acceptedAnswer": { "@type": "Answer", "text": "Soft lighting is great for jewelry photography. You can get high-quality photos next to a window, or diffuse artificial light and avoid on-camera flash because it will not compliment your brand well with that harsh light reflecting off all surfaces giving an unpleasant glare in some cases!" } } ] }
Jewelry Photography Lighting Setup
Jewelry photography is a beautiful and delicate art form. It can be difficult to capture the beauty of jewelry in photos without ruining the piece or making it appear artificial. The following jewelry photography lighting setup will help you to take stunning photos of your jewelry with minimal damage.
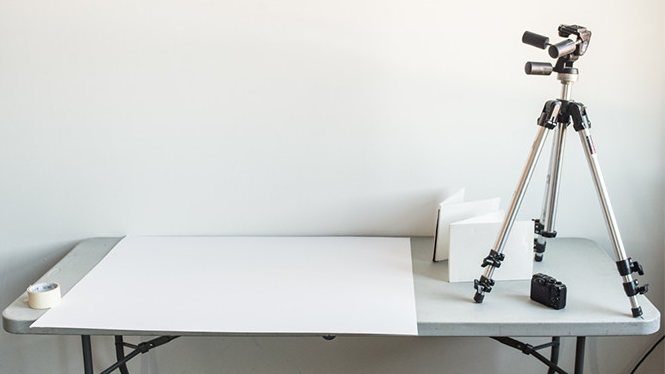
Step 1: Set Up Your Table
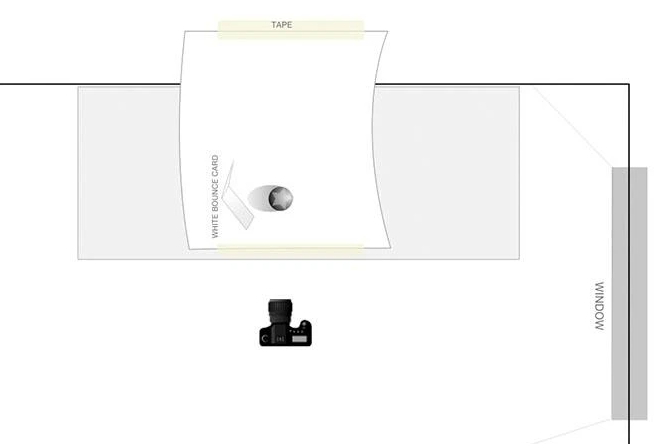
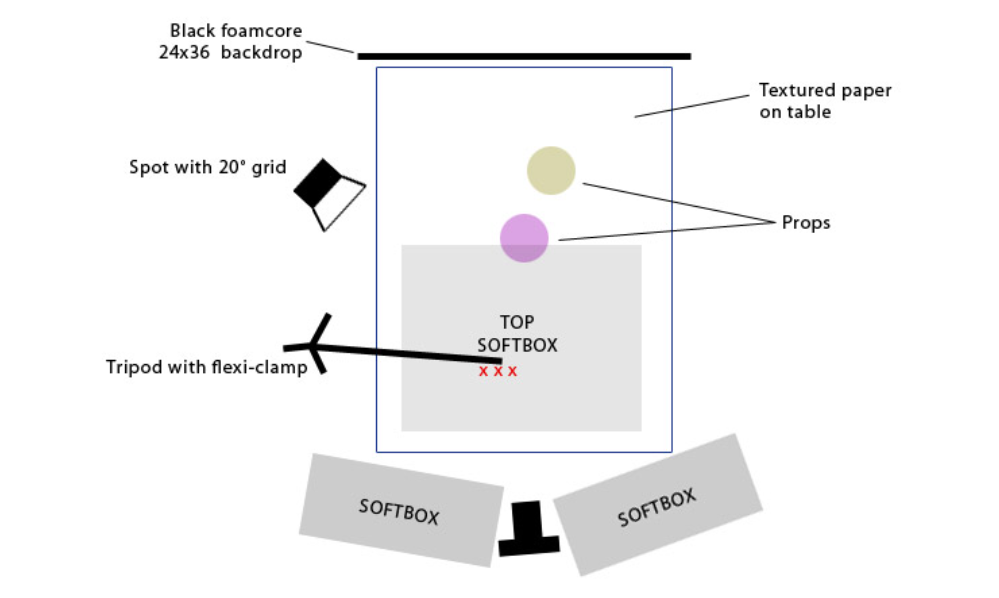
A space for your photo studio is essential. Whether you have a window or not, it’s important that the table be 90 degrees opposite of where the light will enter into its crevices and reflect off walls creating beautiful backdrops with shadows perfect to give an artsy feel! { "@context": "https://schema.org/", "@type": "HowTo", "name": "Jewelry Photography Lighting Setup", "description": "Jewelry Photography Lighting Setup! In jewelry photography, one wants to capture the jewelry as close to true color as possible. This can be a challenge When photographing jewelry we also want it to look like there is nice clean light all around, not too dark or too bright however since we often use flash we obviously need some control over it. The main purpose of jewelry photography lighting setup is to take away shadows and provide both even background lighting and focus on the jewelry itself.", "image": "https://photolightboxes.net/wp-content/uploads/2021/09/Jewelry-Photography-Lighting-Setup-2.png", "totalTime": "PT10M", "estimatedCost": { "@type": "MonetaryAmount", "currency": "USA", "value": "$10" }, "supply": [ { "@type": "HowToSupply", "name": "lighting" } ], "tool": [ { "@type": "HowToTool", "name": "jewelry" } ], "step": [ { "@type": "HowToStep", "text": "A space for your photo studio is essential. Whether you have a window or not, it’s important that the table be 90 degrees opposite of where the light will enter into its crevices and reflect off walls creating beautiful backdrops with shadows perfect to give an artsy feel!", "image": "https://photolightboxes.net/wp-content/uploads/2021/09/Position-your-lighting.png", "name": "Set Up Your Table", "url": "https://photolightboxes.net/jewelry-photography-lighting-setup/#Step_1_Set_Up_Your_Table" }, { "@type": "HowToStep", "text": "The best way to get a pure white background is by placing one light source and softbox or umbrella at an angle of 45 degrees. This will keep the lighting softer on your products, while still having even illumination that looks great in pictures! If you are using backlighting with no other sources available for illuminating what’s before the camera, move closer so there isn’t any shadowing visible when photographed directly up against it.", "image": "https://photolightboxes.net/wp-content/uploads/2021/09/Position-your-lighting.png", "name": "Position your Lighting", "url": "https://photolightboxes.net/jewelry-photography-lighting-setup/#Step_2_Position_your_Lighting" }, { "@type": "HowToStep", "text": "One of the first things you should do when starting out shooting jewelry photography using jewelry photo lightboxes is to get a white background. This can be done in different ways, but know that there’s no right or wrong way. From here, add and test different elements over time until your styling feels natural on how YOU want it!", "image": "https://photolightboxes.net/wp-content/uploads/2021/09/Position-your-lighting.png", "name": "Style your Jewelry", "url": "https://photolightboxes.net/jewelry-photography-lighting-setup/#Step_3_Style_your_Jewelry" }, { "@type": "HowToStep", "text": "Clean and polish your jewelry every time you touch it or wear cotton gloves to avoid leaving fingerprints on delicate pieces. When taking pictures with a DSLR camera for an enlarged image that may be blown up more than once at sizes visible only under magnification – make sure all of its details are captured!", "image": "https://photolightboxes.net/wp-content/uploads/2021/09/Prepare-your-jewelry.png", "name": "Prepare your Jewelry", "url": "https://photolightboxes.net/jewelry-photography-lighting-setup/#Step_4_Prepare_your_Jewelry" }, { "@type": "HowToStep", "text": "Don’t take artsy low-aperture shots of your jewelry that focus on only one part of the product. High aperture, full-focus photography will create a sharp image for potential customers to see every detail and marvel at its beauty! Your images should be at least f/5 so give them what they want: an artful photograph with perfect clarity from all angles—that also captures how bright or subtle colors can really stand out when shot correctly (so make sure the white balance is accurate).", "image": "https://photolightboxes.net/wp-content/uploads/2021/09/Set-your-camera.png", "name": "Set your Camera", "url": "https://photolightboxes.net/jewelry-photography-lighting-setup/#Step_5_Set_your_Camera" }, { "@type": "HowToStep", "text": "When photographing a product, you will want to position your camera on its tripod so that it is shooting slightly down at the item. Then place lights with diffusing umbrellas above and between each side for added lighting effect while also angling them downward towards the display of goods being photographed; this should create even illumination across all areas in order not to have ugly bright spots appear anywhere within the frame when taking pictures like these!", "image": "https://photolightboxes.net/wp-content/uploads/2021/09/Take-the-photo.png", "name": "Take the Photo", "url": "https://photolightboxes.net/jewelry-photography-lighting-setup/#Step_6_Take_the_Photo" }, { "@type": "HowToStep", "text": "After shooting your jewelry, you’ll want to prepare images for an online store. Post-production processing involves making photos look professional and beautiful by retouching the design with a skillful editor who has experience in this field of work. The simplest way is hiring someone on staff that does just that – edits all types of media content from different sources into one cohesive product or advertisement; however many customers find it easier than doing editing themselves!", "image": "https://photolightboxes.net/wp-content/uploads/2021/09/Take-the-photo.png", "name": "Retouch and Finalize", "url": "https://photolightboxes.net/jewelry-photography-lighting-setup/#Step_7_Retouch_and_Finalize" } ] }
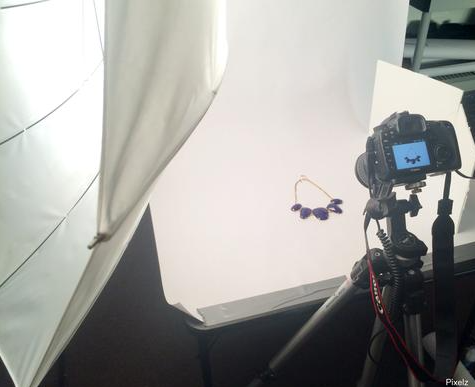
Step 2: Position your Lighting
The best way to get a pure white background is by placing one light source and softbox or umbrella at an angle of 45 degrees. This will keep the lighting softer on your products, while still having even illumination that looks great in pictures! If you are using backlighting with no other sources available for illuminating what’s before the camera, move closer so there isn’t any shadowing visible when photographed directly up against it.
Step 3: Style your Jewelry
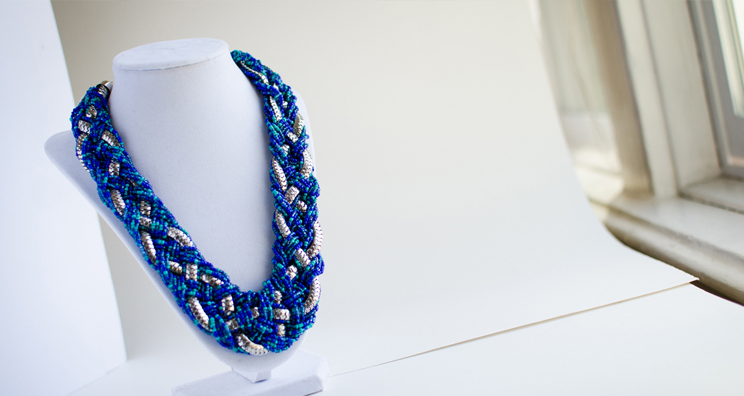
One of the first things you should do when starting out shooting jewelry photography using jewelry photo lightboxes is to get a white background. This can be done in different ways, but know that there’s no right or wrong way. From here, add and test different elements over time until your styling feels natural on how YOU want it!
Step 4: Prepare your Jewelry
Clean and polish your jewelry every time you touch it or wear cotton gloves to avoid leaving fingerprints on delicate pieces. When taking pictures with a DSLR camera for an enlarged image that may be blown up more than once at sizes visible only under magnification – make sure all of its details are captured!
Step 5: Set your Camera
Don’t take artsy low-aperture shots of your jewelry that focus on only one part of the product. High aperture, full-focus photography will create a sharp image for potential customers to see every detail and marvel at its beauty! Your images should be at least f/5 so give them what they want: an artful photograph with perfect clarity from all angles—that also captures how bright or subtle colors can really stand out when shot correctly (so make sure the white balance is accurate).
Either set it manually or use your camera’s automatic mode and double-check the results.
Step 6: Take the Photo
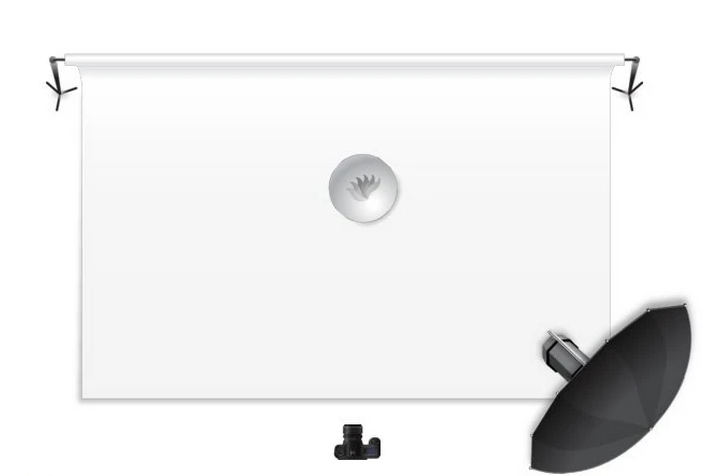
When photographing a product, you will want to position your camera on its tripod so that it is shooting slightly down at the item. Then place lights with diffusing umbrellas above and between each side for added lighting effect while also angling them downward towards the display of goods being photographed; this should create even illumination across all areas in order not to have ugly bright spots appear anywhere within the frame when taking pictures like these!
Step 7: Retouch and Finalize
After shooting your jewelry, you’ll want to prepare images for an online store. Post-production processing involves making photos look professional and beautiful by retouching the design with a skillful editor who has experience in this field of work. The simplest way is hiring someone on staff that does just that – edits all types of media content from different sources into one cohesive product or advertisement; however many customers find it easier than doing editing themselves!
Conclusion
In conclusion, when photographing jewelry it is important to have a good lighting setup. By using the techniques described in this article, you can create beautiful and polished shots of your jewelry pieces.
Frequently Asked Questions
Q1: Why is lighting crucial in jewellery photography?
Lighting is crucial in jewellery photography because it highlights the intricate details, sparkle, and brilliance of jewellery, enhancing its visual appeal.
Q2: What lighting sources are commonly used in jewellery photography setups?
Continuous lighting sources like LED panels, softboxes, and diffused natural light are commonly used in jewellery photography setups.
Q3: How can you minimize reflections and glare when photographing jewellery?
To minimize reflections and glare, use polarizing filters on your camera lens, position the jewellery at the correct angle, and control the direction of light sources.
Q4: What background materials are suitable for jewellery photography?
Background materials such as white or coloured acrylic sheets, textured papers, velvet, or reflective surfaces like glass or acrylic can be suitable for jewellery photography backgrounds.
Q5: Why is a lightbox or light tent often used in jewellery photography?
A lightbox or light tent creates soft, diffused lighting that minimizes harsh shadows and highlights, allowing the jewelry to be captured with clarity and precision.


