How to Use a Light Tent for Small Product Photography! In today’s visually-driven world, compelling product photography is crucial in catching consumers’ attention and standing out. But how can you achieve magazine-like quality photos on a tight budget? The answer lies within the magic of a light tent. This compact foldable contraption has revolutionized how photographers capture small products by providing controlled lighting and eliminating harsh shadows – all in the comfort of their own space! If you’re ready to take your product photography skills up several notches, join us as we delve into using a light tent for small product photography and uncover tips and techniques to make your shots shine like never before. { "@context": "https://schema.org/", "@type": "FAQPage", "mainEntity": [ { "@type": "Question", "name": "What are the benefits of using a light tent?", "acceptedAnswer": { "@type": "Answer", "text": "There are several benefits to using a light tent, the main one being that it creates an even and soft illumination which is perfect for photographing small objects. It also eliminates the need for a studio backdrop, as the fabric walls of the light tent will provide a natural-looking background. Additionally, the light tent can be used to create interesting creative effects, such as reflections and shadows." } }, { "@type": "Question", "name": "How do I set up a light tent?", "acceptedAnswer": { "@type": "Answer", "text": "Setting up a light tent is very simple. First, open the fabric walls and lay them out on a flat surface. Then, place the object you want to photograph in the center of the light tent. Finally, set up your external light source (either a flash or studio lamp) and point it at the fabric walls of the light tent. You may need to adjust the height and angle of the light source to achieve the desired effect." } }, { "@type": "Question", "name": "How does a light tent work?", "acceptedAnswer": { "@type": "Answer", "text": "Light tents work by using a light source to create even lighting within the structure. This is typically done using white fabric or translucent material, which helps to diffuse the light and provide an evenly lit scene. This is often beneficial for photographing small objects or products, as it can help to minimize shadows and produce more consistent results." } }, { "@type": "Question", "name": "Where Can I Buy Small Photo Light Tents?", "acceptedAnswer": { "@type": "Answer", "text": "Yes, Of course, you can buy a small photo light tent from this site https://photolightboxes.net/" } } ] }
How to Use a Light Tent for Small Product Photography
Before using the Photo Light Tent, we will look at what a Light Tent is?
What is a Light Tent?
A light tent is a device that is used to take professional-level photographs of small objects. The object is placed inside the tent and then the photographer uses a flash to light the object from all directions. This creates an even exposure and eliminates shadows. Light tents are available in a variety of sizes, so they can be used to photograph small to large objects.
Shooting with a Light Tent
When setting up your tent to take pictures, it is important that you find a spot for the structure where there are no obstacles in front of or behind them. This way they can easily maneuver around while taking their photoshoots without needing help from others and also ensure stability when on top of whatever surface serves as a home base!
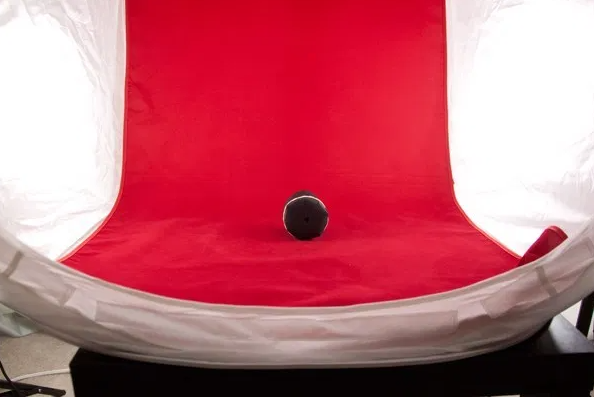
The backdrop is attached at the top inside of my tent and should fall freely down towards the bottom. You want to make sure that it’s clean without any debris or wrinkles before shooting so if using fabric just iron for a smooth look (you can also roll up on a cardboard tube after shots). Consider keeping lint roller handy as well when dealing with inevitable dust/debris from being outside in nature.”
Place the subject inside, and move it around until you find lighting that looks good for what type of shots you’re trying to take! Experiment with pointed lights as well as those at an angle so there are no hard edges showing in photos outside of what’s behind them (since we can’t see through walls).
A lot goes into creating these natural backdrops you’ll need some supplies like sheets or tarps instead of just white tents because surfaces reflect light differently when colorful items come within view; experiment by moving forward/backward until everything has been dialed in perfectly then zoom away excess space between subjects & background.
Camera Set-up
To get the best shots, use a tripod and set it up quickly. If you are using one of our recommended lenses with IS or VR capabilities turn those features off so that there is no blurriness due to camera shake!
When setting up your equipment make sure everything has been compactly stored away before taking photos for optimal results.
Camera Setting
In-camera setting! If you want to create an image that is both compelling and creative, start by shooting in aperture priority mode with your ISO set at 100. This will allow for the best balance between quality and blurriness as well allowing it to be whatever look suits what kind of photoshoots best! A wide opening like f/1.8 can produce a lot less depth while still retaining focus across all parts meaning they’ll turn out beautifully blurry next time try using one with smaller dimensions such as 22mm which provides just enough coverage without being too distracting.
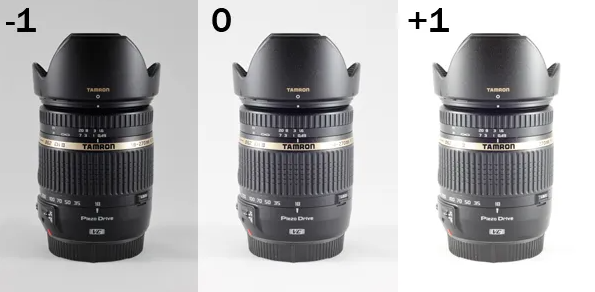
The best way to create a stunning photo is by using one of the many modes found in your camera. If you want something with an artistic feel, then aperture priority mode might be what’s needed! This will allow us as photographers some control over how much light comes into our own scene and shapes are made accordingly- so don’t forget this setting if it suits who we are trying to become.
In the Last..!
For those photos that need a little something extra to make their background look white, you can try using the thin black border on an all-white image. This will help avoid any weird colors or stains from showing up in your final product shots and give it more of a professional feel!
Yes, Of course, you can buy a small photo light tent from this site https://photolightboxes.net/
Conclusion
In conclusion, using a light tent for small product photography can significantly enhance the quality and professionalism of your images. By diffusing the light and eliminating harsh shadows, a light tent creates a soft and even lighting environment that showcases the details of your products. Additionally, the adjustable backdrops allow versatility in creating moods and aesthetics. With careful consideration of lighting placement and camera settings, you can capture stunning product photos to attract customers and boost sales. So, why wait? Invest in a light tent today and take your small product photography to the next level!
Note: Interested to know How to Set Up Light Tent for Small Product Photography? Read here.
Frequently Asked Questions
Q1: What is a light tent used for in small product photography?
A1: A light tent, also known as a lightbox or photo tent, is used to diffuse and soften the light, reducing shadows and reflections when photographing small products.
Q2: How do you set up a light tent for small product photography?
A2: To set up a light tent, unfold it and position it on a flat surface. Place your product inside the tent, and arrange your lighting sources outside the tent.
Q3: What lighting sources are commonly used with a light tent?
A3: Common lighting sources include external studio lights, continuous LED lights, or natural window lights, depending on your preferences and equipment.
Q4: Why is diffusion critical when using a light tent?
A4: Diffusion helps create soft, even lighting by scattering and dispersing light, which minimizes harsh shadows and highlights, ideal for product photography.
Q5: What are some advantages of using a light tent for small product photography?
A5: Using lightweight tents results in professional-looking product images with consistent lighting, reduced glare, and improved colour accuracy, making products appear more appealing to potential buyers.


