How to Straighten Photo in Lightroom? How to Straighten Photo in Lightroom: No doubt, Lightroom is by far one of the most exciting platforms to give your photos a new life. There is so much that it has to offer from changing your dress color to overall phenomenal editing.
What is Lightroom
For those who don’t know, Lightroom is a comprehensive photo-editing platform provided and owned by Adobe. Right now, it is one of the most preferred tools for manipulating and creating images. It has given a lot of young people a chance to show their creativity by applying techniques that no one would have ever imagined.
Many people use Lightroom to straighten their photos. You are doing it wrong if you haven’t straightened your photos through this software yet.
Let Us Tell You How You Can Straighten up Photos in Lightroom in 3 Simple Steps.

3 Simple Steps to Strengthen up Photos in Lightroom:
1. The first thing you need to do is manage the lens distortion. Just fix it by navigating to the Lens Correction panel and going to the Enable Profile Correction option. The options are pretty easy to navigate and you won’t have a hard time looking for them.
2. Move your cursor towards the Crop Overlay tool. You would see it on the right side of your screen. The Crop Overlay tool option will have an auto button. Click the button and that’s how you will be able to fix the uneven horizon.
3. The final step is pretty easy and simple. Here you will be required to fix the vertical and horizontal perspective distortions. You can do so by going to the Transform Panel and using the upright tools available there.
How to Copy Settings from One Photo to Another in Lightroom

Copying settings from one photo to another is also a very frequently asked question. It might seem confusing to some but once you get the hang of it, it’s all good. Anyways, let’s get to know how you can copy settings from one photo to another in Lightroom.
Simple Process Copy Settings from One Photo to Another in Lightroom
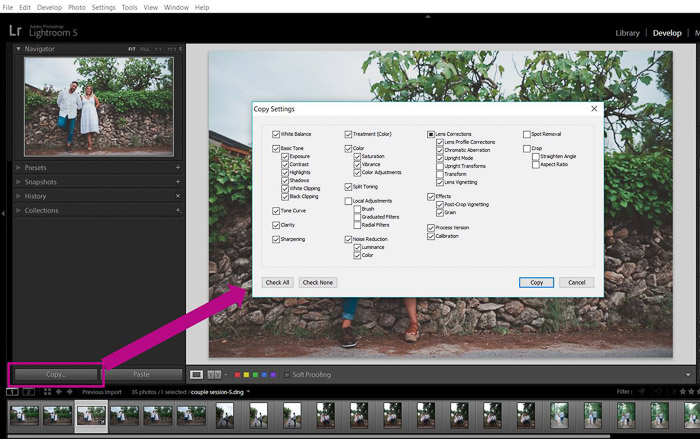
1. Bring all the photos you wish to edit on Lightroom. Now, go to the develop module and edit the first image however you like. Click on the copy button located towards the bottom of the left panel. You can also do so without having to open the development module. Just go to the library module, select an already edited picture, and click on the develop settings. There you will see copy settings options. Click that option and the editing settings will be copied.
2. Once you have copied the settings, you can successfully take those settings to another image. Open the unedited image and simply click on the paste button. You may also use the short key Ctrl+Shift+V. It’s as simple as that.
3. The best part about Adobe Lightroom is that you can copy editing settings to multiple images all at once. This is called the batch edit Lightroom technique. It saves time and hassle and makes editing a therapeutic process. What you need to do is go to the library module and press ‘G’. It will show you a grid view allowing you to select multiple images that you want to edit. Once selected, click develop settings, and finally paste. Feel free to use shortcuts like Ctril+Shift+V.
We hope our article has cleared out your concerns regarding the two techniques mentioned. However, don’t lose hope if you are unable to get what you had expected when using Lightroom. Learning any software requires patience and determination.
Just stay consistent and keep doing your thing to finally get the desired results. We are sure you will get the best out of every step and master the art of manipulation very soon,
For more queries and information, stay connected to this forum. We keep coming up with helpful content to make the photography and editing journey a wholesome experience for you.
Note: Interested to know How to get Adobe Lightroom for free.


