How to Make a Photo Backdrop with a Sheet! Photography is an art that revolves around capturing moments, stories, and emotions. One of the key elements in creating stunning photographs is the backdrop. A well-chosen backdrop can set the stage, enhance the subject, and elevate the overall quality of your images. But what if I told you that you can create a captivating photo backdrop with something as simple as a bedsheet? Yes, it’s true! In this comprehensive guide, we will walk you through the steps of how to make a photo backdrop with a sheet, unlocking a world of creative possibilities for your photography endeavours. { "@context": "https://schema.org/", "@type": "HowTo", "name": "How to Make a Photo Backdrop with a Sheet", "description": "Do you want to take your photography to the next level but don’t have the budget for an expensive backdrop? Or maybe you’re just looking for a fun project to do with your friends or family. In either case, making a photo backdrop with a sheet is a cheap and easy way to get the look you want. In this article, we will talk about how to make a photo backdrop with a sheet. All you need is a sheet, some hooks, and some imagination.", "image": "https://photolightboxes.net/wp-content/uploads/2022/03/How-to-Make-a-Photo-Backdrop-with-a-Sheet.png", "totalTime": "PT10M", "estimatedCost": { "@type": "MonetaryAmount", "currency": "USD", "value": "5$" }, "supply": [ { "@type": "HowToSupply", "name": "Wall Hooks" } ], "tool": [ { "@type": "HowToTool", "name": "Tape" } ], "step": [ { "@type": "HowToStep", "text": "When deciding where to hang your backdrop, make sure you have a solid wall to hang it on. You’ll also need a few hooks to help keep it in place. If you’re using a fabric backdrop, make sure the fabric is tight and doesn’t sag.", "image": "https://photolightboxes.net/wp-content/uploads/2022/03/How-to-Make-a-Photo-Backdrop-with-a-Sheet.png", "name": "PURCHASE SOME ADHESIVE WALL HOOKS", "url": "https://photolightboxes.net/how-to-make-a-photo-backdrop-with-a-sheet/#Step_1_Purchase_Some_Adhesive_Wall_Hooks" }, { "@type": "HowToStep", "text": "If you want to make a photo backdrop with a sheet, you will need to first cut the sheet in half. Then, you can hang the sheet up on a wall or door using some tape or pins. You can also use clamps to secure the sheet in place. If you want to use the sheet as a backdrop for a photoshoot, make sure that the lighting is good and that there is nothing behind the sheet that could be reflected in the photos.", "image": "https://photolightboxes.net/wp-content/uploads/2022/03/How-to-Make-a-Photo-Backdrop-with-a-Sheet.png", "name": "CUT THE SHEET IN HALF", "url": "https://photolightboxes.net/how-to-make-a-photo-backdrop-with-a-sheet/#Step_2_Cut_the_Sheet_in_Half" }, { "@type": "HowToStep", "text": "To install the hooks, start by measuring the height and width of your sheet. Then, use a level to mark where the hooks should go on your wall. Make sure that the marks are evenly spaced apart.\n\nOnce you’ve marked the spots for the hooks, use a drill to make small holes in the wall. If you’re worried about damaging your wall, you can use a plastic anchor instead of a metal one. Then, insert the screws that came with the hooks into the holes, and twist them until they’re tight.", "image": "https://photolightboxes.net/wp-content/uploads/2022/03/How-to-Make-a-Photo-Backdrop-with-a-Sheet.png", "name": "INSTALL THE HOOKS ON YOUR WALL", "url": "https://photolightboxes.net/how-to-make-a-photo-backdrop-with-a-sheet/#Step_3_Install_the_Hooks_on_Your_Wall" }, { "@type": "HowToStep", "text": "Hang the sheet on a clothesline or curtain rod. If you don’t have either of those, use tape to attach the sheet to the wall. Be sure to smooth out any wrinkles in the sheet before taking your photos.", "image": "https://photolightboxes.net/wp-content/uploads/2022/03/How-to-Make-a-Photo-Backdrop-with-a-Sheet.png", "name": "HANG THE SHEET", "url": "https://photolightboxes.net/how-to-make-a-photo-backdrop-with-a-sheet/#Step_4_Hang_the_Sheet" }, { "@type": "HowToStep", "text": "Tape the sheet to the wall. You may want to use two or three pieces of tape to make sure it’s secure.", "image": "https://photolightboxes.net/wp-content/uploads/2022/03/How-to-Make-a-Photo-Backdrop-with-a-Sheet.png", "name": "THE SHEET TO THE WALL", "url": "https://photolightboxes.net/how-to-make-a-photo-backdrop-with-a-sheet/#Step_5_Tape_the_Sheet_to_the_Wall" }, { "@type": "HowToStep", "text": "If you’re using props, try to choose items that have similar colors or textures. By doing so, your photos will look more cohesive.", "image": "https://photolightboxes.net/wp-content/uploads/2022/03/How-to-Make-a-Photo-Backdrop-with-a-Sheet.png", "name": "ADD PROPS", "url": "https://photolightboxes.net/how-to-make-a-photo-backdrop-with-a-sheet/#Step_6_Add_Props" }, { "@type": "HowToStep", "text": "Finally, take photos using the sheet as your backdrop.", "image": "https://photolightboxes.net/wp-content/uploads/2022/03/How-to-Make-a-Photo-Backdrop-with-a-Sheet.png", "name": "TAKE PHOTOS!", "url": "https://photolightboxes.net/how-to-make-a-photo-backdrop-with-a-sheet/#Step_7_Take_Photos" } ] }
How to Make a Photo Backdrop with a Sheet
Here’s a step-by-step guide to creating a photo backdrop with a sheet.
Why a DIY Photo Backdrop?
Before we dive into the process of creating a photo backdrop with a sheet, let’s explore why a DIY backdrop might be the right choice for you:
- Cost-Effective: Professional photo backdrops can be expensive, especially if you’re just starting as a photographer. DIY backdrops offer a budget-friendly alternative without compromising on quality.
- Versatility: A DIY backdrop allows you to experiment with various colours, textures, and styles to suit your specific project. You’re not limited to a single design or look.
- Creativity: Making your backdrop allows you to exercise your creative muscles. You can design and customize it to match your unique vision and style.
- Accessibility: Finding a bedsheet is easy – chances are you already have one at home. You won’t need to search for specialized photography equipment.
Making a Sheet Photo Backdrop | Step-by-Step Guide
Now that we’ve established the benefits, let’s move on to the step-by-step process of creating your DIY photo backdrop with a sheet.
Materials You’ll Need
Before you start, gather these essential materials:
- A Bed Sheet: Choose a bedsheet that fits the size of the backdrop you need. Solid colours work well for classic portraits, while patterns and textures can add visual interest.
- Support Structure: You’ll need something to hang or attach the sheet to. This could be a backdrop stand, a curtain rod, a wall-mounted hook, or any stable structure that can hold the weight of the sheet.
- Clamps or Clips: These will come in handy for securing the sheet to your chosen support structure.
- Iron and Ironing Board: To ensure your sheet is free of wrinkles and creases.
- Sturdy Surface: You’ll need a flat surface to lay out and work on the sheet.
- Optional Props: Depending on your photography concept, you might want to have additional props like chairs, cushions, or decorative items.
Now that you have everything you need, let’s get started on creating your DIY photo backdrop.
Step 1: Prepare Your Space
Clear a space in your home or studio for your DIY backdrop setup. Ensure that it’s well-lit and free from clutter. A clean, unobstructed space will make it easier to work and capture beautiful shots.
Step 2: Choose and Prepare the Sheet
Select the bedsheet you want to use as your backdrop. Before you hang it, iron out any wrinkles or creases to ensure a smooth surface. This step is crucial because wrinkles can cast unwanted shadows in your photos.
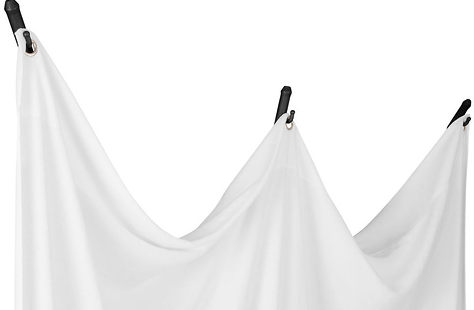
Step 3: Hang the Sheet
Now, it’s time to hang the sheet. If you have a backdrop stand, set it up according to the manufacturer’s instructions. If not, you can use alternative methods:
- Curtain Rod: If you have a curtain rod, drape the sheet over it and secure it in place using clamps or clips.
- Wall-Mounted Hook: Attach one end of the sheet to a wall-mounted hook and let it drape down naturally. Use clamps or clips to ensure it stays in place.
- Tape: For a temporary setup, you can tape the sheet to a wall or any other flat surface. Just be careful not to damage your wall or the sheet.
Ensure that the sheet hangs evenly without any lumps or folds.
Step 4: Customize Your Backdrop
This is where your creativity comes into play. Depending on your photography style and the mood you want to convey, you can customize your backdrop in several ways:
- Texture: Experiment with different textures by layering multiple sheets or adding fabric overlays.
- Colour: Choose a sheet colour that complements your subject or the theme of your photoshoot.
- Patterns: If you have a patterned sheet, consider how it interacts with your subject. Patterns can add depth and interest to your photos.
- Props: Integrate props that enhance the storytelling aspect of your photos. For example, you can add furniture, flowers, or other decorative items.
Step 5: Set Up Lighting
Proper lighting is crucial in photography. Use natural light from windows, or if you’re shooting indoors, set up soft, diffused lighting sources like softboxes or photography umbrellas. Experiment with the angle and intensity of the light to achieve the desired effect.
Step 6: Start Shooting
With your DIY photo backdrop in place and your lighting set up, you’re ready to start capturing stunning images. Be patient and take your time to compose your shots, adjust your camera settings, and direct your subject as needed.
Tips for a Successful DIY Photo Backdrop
- Experiment: Don’t be afraid to try different colours, textures, and styles for your backdrops. You might discover unique looks that work exceptionally well for your photography.
- Keep it Wrinkle-Free: Always iron your sheet before each photoshoot to ensure a smooth backdrop.
- Consider the Subject: Think about how the backdrop complements your subject. The backdrop should enhance, not overpower, the main focus of your photos.
- Cleanliness: Keep your sheet backdrop clean and free of stains. Regularly wash and maintain it to ensure it remains photo-ready.
- Storage: Store your DIY backdrops properly to prevent wrinkles and damage. Consider rolling them up on a cardboard tube to maintain their condition.
Conclusion
Creating a photo backdrop with a simple sheet is cost-effective and a rewarding creative endeavour. Whether you’re a professional photographer looking to expand your toolkit or an enthusiast eager to capture beautiful moments, this DIY approach can offer endless possibilities.
Remember, the key to a successful DIY photo backdrop lies in your creativity and attention to detail. With the right sheet, a little ingenuity, and the willingness to experiment, you can craft backdrops that will elevate your photography to new heights. So, grab your sheet, set up your space, and let your imagination run wild as you embark on this exciting photographic journey. Happy shooting!
Note: Interested to know about DIY Photography Backdrops?


