Making a Lightbox for Tracing! A lightbox is a tool that helps artists trace their work onto another surface, making it easier and less time-consuming to complete their drawings. This will be helpful for people who are just beginning art projects because they don’t have the skills or knowledge of how to use more complicated tools like reams or t-squares. Making your own lightbox can also save you money on expensive drafting supplies!
A photo lightbox can be a really helpful tool for making detailed tracing easier. They are great for making intricate designs and drawings, and they also help you see the lines on your paper more clearly. This article will walk you through making a lightbox that is both easy to make and cheap! { "@context": "https://schema.org/", "@type": "HowTo", "name": "Making a Lightbox for Tracing", "description": "Making a Lightbox for Tracing! A lightbox is a tool that helps artists trace their work onto another surface, making it easier and less time-consuming to complete their drawings. This will be helpful for people who are just beginning art projects because they don't have the skills or knowledge of how to use more complicated tools like reams or t-squares. Making your own lightbox can also save you money on expensive drafting supplies! A photo lightbox can be a really helpful tool for making detailed tracing easier. They are great for making intricate designs and drawings, and they also help you see the lines on your paper more clearly. This article will walk you through making a lightbox that is both easy to make and cheap!", "image": "https://photolightboxes.net/wp-content/uploads/2021/10/Making-a-Lightbox-for-Tracing-680x350.png", "totalTime": "PT10M", "estimatedCost": { "@type": "MonetaryAmount", "currency": "USA", "value": "$10" }, "supply": [ { "@type": "HowToSupply", "name": "Sheet metal bending brake" }, { "@type": "HowToSupply", "name": "Spot Welder" }, { "@type": "HowToSupply", "name": "Laser Cutter" } ], "tool": [ { "@type": "HowToTool", "name": "Computer System" }, { "@type": "HowToTool", "name": "Soldering Iron" }, { "@type": "HowToTool", "name": "Autodesk Inventor 2012" } ], "step": [ { "@type": "HowToStep", "text": "Materials:\n\"Diodes\" LED set from Ikea.\n24\" x 24\" Sheet metal (Steel)\nEquipment:\nFlowJet waterjet cutter\nSheet metal bending brake\nSpot Welder\nLaser Cutter\nPowder coat gun and oven\nTools:\nAutodesk Inventor 2012\nComputer System\nSoldering Iron", "name": "Materials/Tools/Equipment", "url": "https://photolightboxes.net/making-a-lightbox-for-tracing/#Step_1_MaterialsToolsEquipment" }, { "@type": "HowToStep", "text": "I started off by designing the box using AutoDesk's Sheet Metal tools, and when it looked perfect I exported a flat pattern as DXF. This was used for running Flowjet 160 on my 3D printer!", "image": "https://photolightboxes.net/wp-content/uploads/2021/10/Design-the-Box.png", "name": "Design the Box", "url": "https://photolightboxes.net/making-a-lightbox-for-tracing/#Step_2_Design_the_Box" }, { "@type": "HowToStep", "text": "I was able to cut the flat pattern for my box with a precision that is nearly impossible by hand. It only took me about two minutes and it looks amazing!", "image": "https://photolightboxes.net/wp-content/uploads/2021/10/Cut-the-Sheet-Metal.png", "name": "Cut the Sheet Metal", "url": "https://photolightboxes.net/making-a-lightbox-for-tracing/#Step_3_Cut_the_Sheet_Metal" }, { "@type": "HowToStep", "text": "If you are looking for a quick and easy way to join two pieces of metal, then spot welding is a perfect choice. There's no need to install any tools or grinders.", "image": "https://photolightboxes.net/wp-content/uploads/2021/10/Spot-Weld-Corners.png", "name": "Spot Weld Corners", "url": "https://photolightboxes.net/making-a-lightbox-for-tracing/#Step_4_Spot_Weld_Corners" }, { "@type": "HowToStep", "text": "I chose to powder coat the metal box within mirror white, in order for it to reflect as much light and give off a beautiful glow. You could use spray paint or even do multiple colors if you wanted!", "image": "https://photolightboxes.net/wp-content/uploads/2021/10/Paint.png", "name": "Paint", "url": "https://photolightboxes.net/making-a-lightbox-for-tracing/#Step_5_Paint" }, { "@type": "HowToStep", "text": "The Diode kit comes with really short connectors and really long wires. I chose to shorten the wires by cutting and soldering them. You could also use solderless connectors or just leave them full length.", "image": "https://photolightboxes.net/wp-content/uploads/2021/10/Install-LEDs.png", "name": "Install LEDs Lights", "url": "https://photolightboxes.net/making-a-lightbox-for-tracing/#Step_6_Install_LEDs_Lights" }, { "@type": "HowToStep", "text": "Plug it in and enjoy your tracing lightbox.", "image": "https://photolightboxes.net/wp-content/uploads/2021/10/Plug-It-in-and-Enjoy-1.png", "name": "Plug It in and Enjoy", "url": "https://photolightboxes.net/making-a-lightbox-for-tracing/#Step_7_Plug_It_in_and_Enjoy" } ] } { "@context": "https://schema.org/", "@type": "FAQPage", "mainEntity": [ { "@type": "Question", "name": "What is a tracing lightbox used for?", "acceptedAnswer": { "@type": "Answer", "text": "Lightboxes are extremely useful for artists, designers, and makers of all sorts. They allow you to trace your original subject onto different types of papers with ease!" } }, { "@type": "Question", "name": "How does a tracing lightbox work?", "acceptedAnswer": { "@type": "Answer", "text": "A tracing lightbox is a device that shines bright lights through drawings, sketches, and illustrations to make them look like they were professionally done." } }, { "@type": "Question", "name": "How do you use a tracer lightbox?", "acceptedAnswer": { "@type": "Answer", "text": "After you have selected a template picture, place tracing paper over it and begin drawing. The default app is a white screen with brightness control settings that are easy to use for beginners just starting out in 3D modeling apps like SketchUp or Procreate on the MacBook Pro!" } }, { "@type": "Question", "name": "What is a lightbox/light table?", "acceptedAnswer": { "@type": "Answer", "text": "It's hard to believe, but tracing paper is actually a thing of the past. When you were little and wanted your drawing copied for school or at home with no art supplies available; all that was necessary would be some thin sheets of graphite pressed against windows by daylight (or even artificial light). That same effect can still occur using modern-day equivalents like lightboxes and tables- though now there are other options too!" } } ] }
Making a lightbox is an easy way to capture steps taken during your work. It can be used for documenting projects, proofs of work, or anything else you need to keep track of. This tutorial will show you how to make a basic lightbox using online tools.
I used the following materials to make this project:
Making a Lightbox for Tracing
Step 1: Materials/Tools/Equipment
Materials:
“Diodes” LED set from Ikea.
24″ x 24″ Sheet metal (Steel)
Equipment:
FlowJet waterjet cutter
Sheet metal bending brake
Spot Welder
Laser Cutter
Powder coat gun and oven
Tools:
Autodesk Inventor 2012
Computer System
Soldering Iron
Step 2: Design the Box
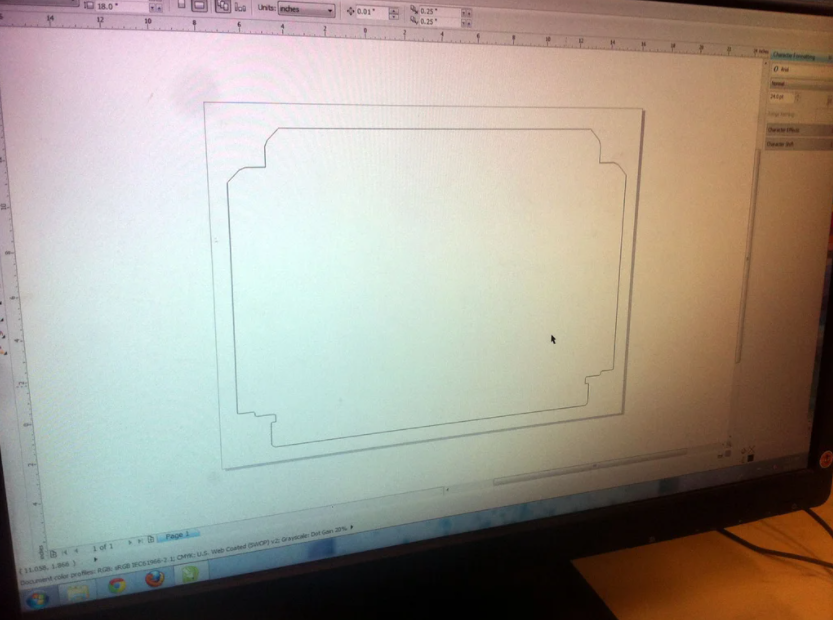
I started off by designing the box using AutoDesk’s Sheet Metal tools, and when it looked perfect I exported a flat pattern as DXF. This was used for running Flowjet 160 on my 3D printer!
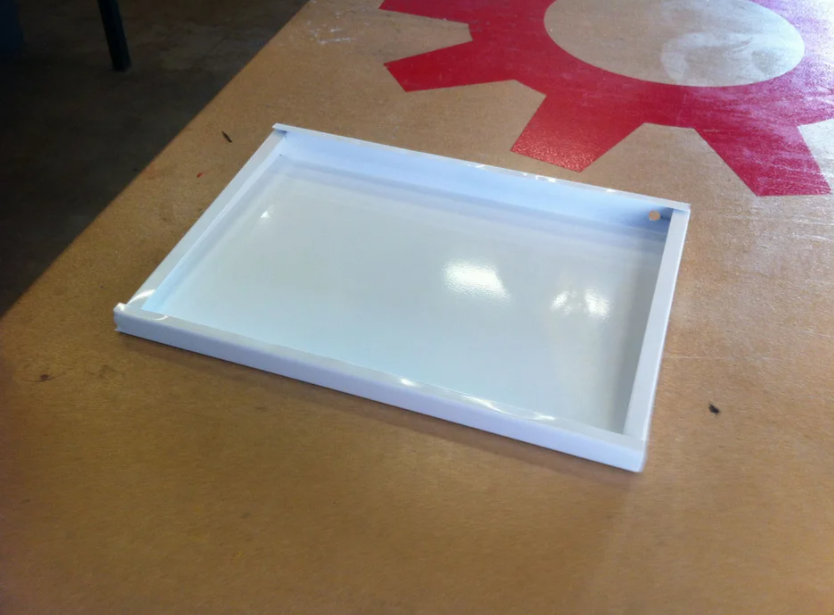
Step 3: Cut the Sheet Metal
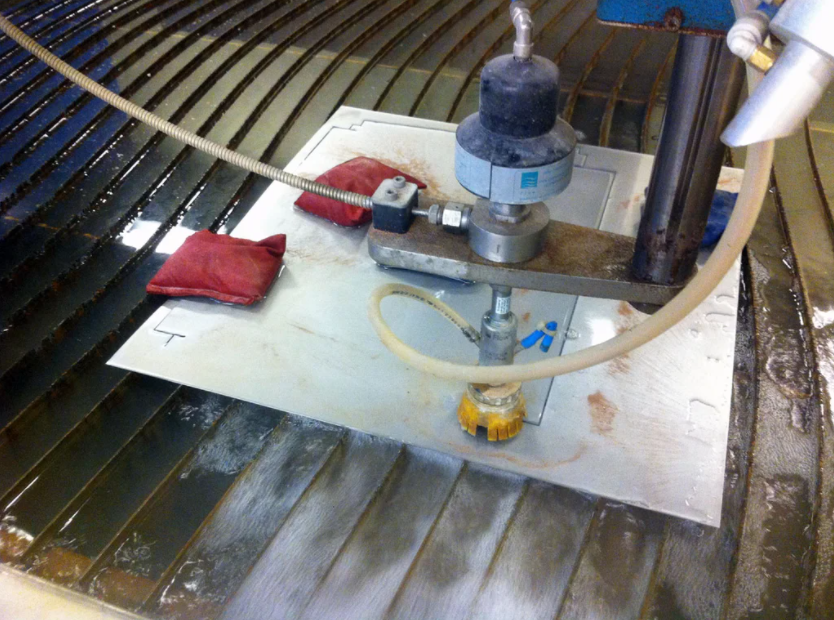
A less expensive option is to make your own lightbox using a sheet of metal and some basic supplies from the hardware store. Measure the size of the sheet of metal that you want to use for your lightbox. It should be at least 18″x24″, but bigger is better. Cut the metal using a hacksaw or tin snips.
Step 4: Spot Weld Corners
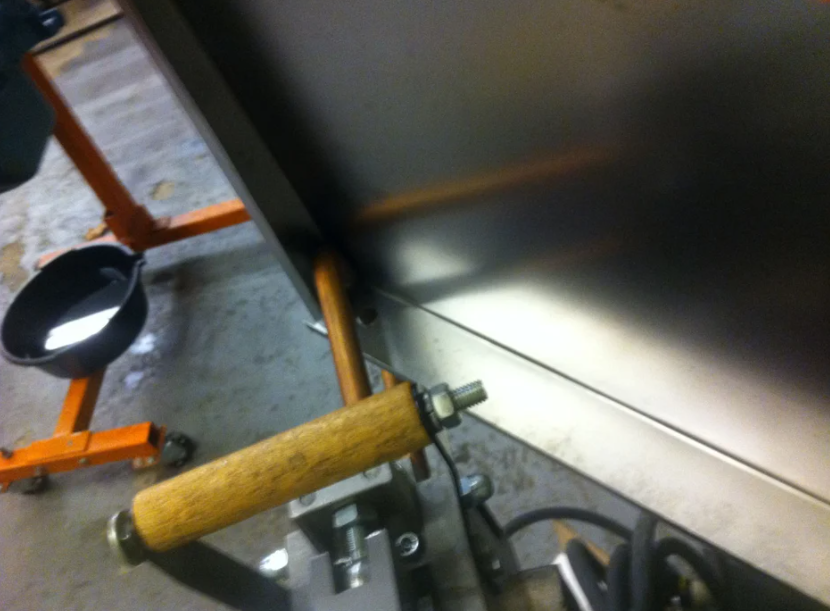
If you are looking for a quick and easy way to join two pieces of metal, then spot welding is a perfect choice. There’s no need to install any tools or grinders.
Step 5: Paint
I chose to powder coat the metal box within mirror white, in order for it to reflect as much light and give off a beautiful glow. You could use spray paint or even do multiple colors if you wanted!
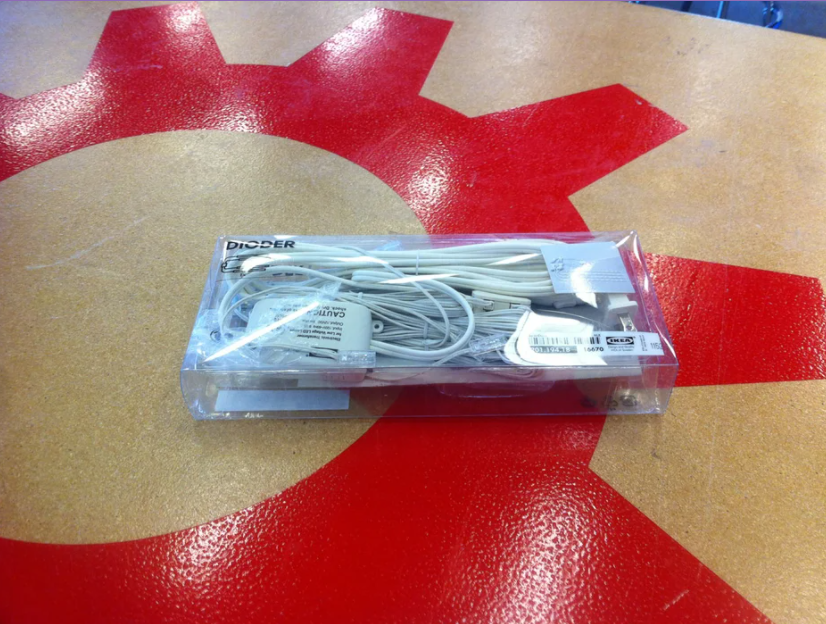
Step 6: Install LEDs Lights
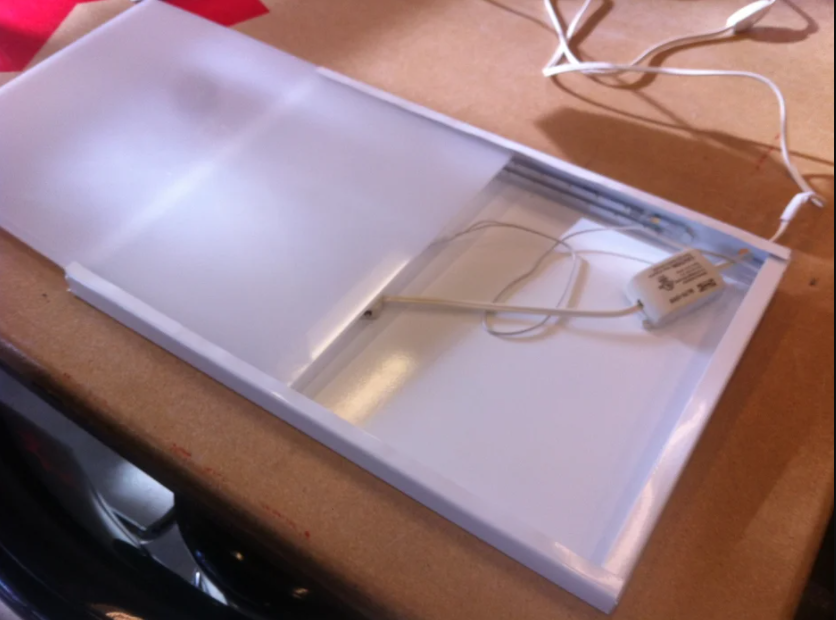
The Diode kit comes with really short connectors and really long wires. I chose to shorten the wires by cutting and soldering them. You could also use solderless connectors or just leave them full length.
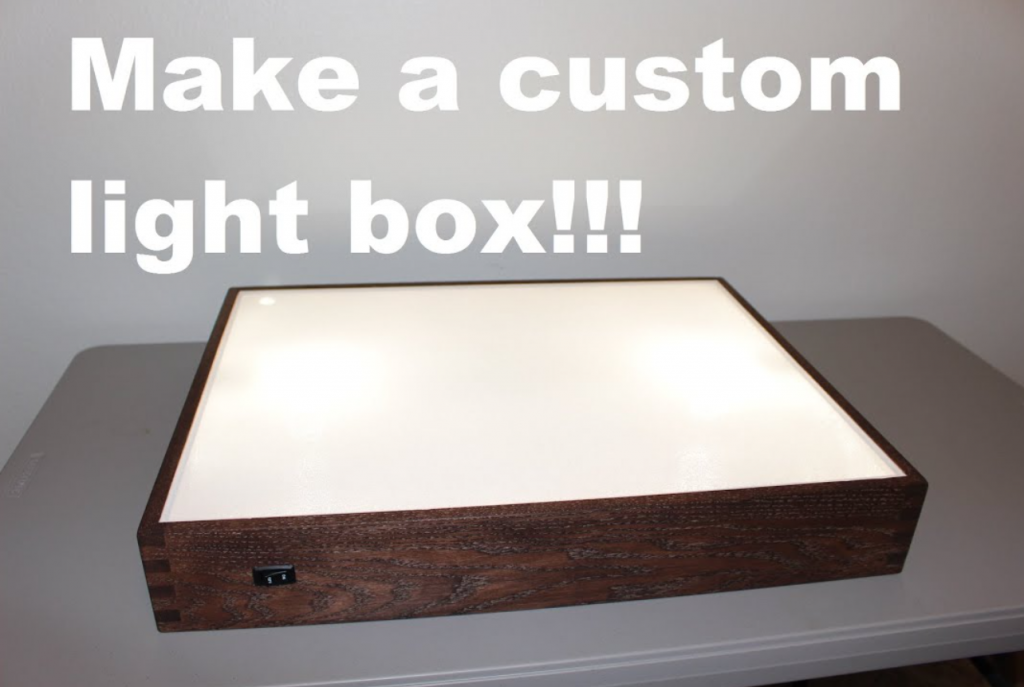
Step 7: Plug It in and Enjoy
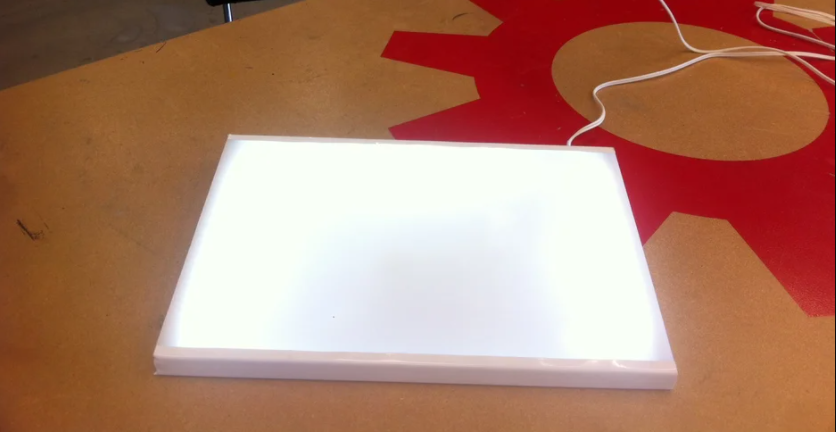
Plug it in and enjoy your tracing lightbox.
Frequently Asked Questions
What is a tracing lightbox used for?
A tracing lightbox is a device typically used by artists and designers to trace images and designs. The lightbox contains a bright light that is emitted from the surface of the box, which allows for the easy tracing of images onto paper or other surfaces. Tracing lightboxes are available in a variety of sizes, and some even include an adjustable arm to help position the image correctly. They are a popular tool for artists because they produce high-quality results and are relatively affordable.
How does a tracing lightbox work?
A tracing lightbox is a device that allows an artist to trace an image onto paper. The lightbox has a clear surface on which the image is placed. The artist then traces the image by looking at it through a piece of paper that has been placed over the lightbox. The lightbox creates a bright, even light that makes it easy to see the details of the image. This makes it easy to trace the outline of the image accurately.
How do you use a tracer lightbox?
After you have selected a template picture, place tracing paper over it and begin drawing. The default app is a white screen with brightness control settings that are easy to use for beginners just starting out in 3D modeling apps like SketchUp or Procreate on the MacBook Pro!
What is a lightbox/light table?
It’s hard to believe, but tracing paper is actually a thing of the past. When you were little and wanted your drawing copied for school or at home with no art supplies available; all that was necessary would be some thin sheets of graphite pressed against windows by daylight (or even artificial light). That same effect can still occur using modern-day equivalents like lightboxes and tables- though now there are other options too!


