Lightbox Photography Tips: Every crafter, artist, and cook wants to capture high-quality photographs of their creations for different purposes. Some may like to feature them on a blog post, share them with friends on social media, or offer them online sales.
There may be countless ways to get excellent images for your requirements, but the most convenient way is to use the best photography lightboxes. Featuring a white background with a clear setup, these enclosed boxes are ideal for online business. After finding the best photography lightbox, now it’s time to get the most out of it. Well, there may be an instructional guide available with your box, but we are going to share some useful tips for photo lightboxes that will surely help you to achieve the best results.
Useful Tips for Lightboxes Photography
To take remarkable product photos, you only need a few things. You can use any camera (phone or DSLR) and a photography lightbox to capture your desired images. However, the two prime factors to excellent photos are light and stability. The camera is made to capture light, so you want a decent amount of it and control where and how it hits the product. You need a strong surface for stability to place the product on and the best way to hold the camera still.
How to Use Photo lightboxes for Product Photography
For a large product or group of people, you need giant lights and reflectors along with a big backdrop cloth. Whereas when dealing with a small product, you just need a small lightbox setup. The complete package comes with a box, lights, a desktop tripod, and multiple color backdrops.
Essential Things for Lightbox Setup
Here is a list of essential things you need to get before getting started.
- Phone Camera or DSLR
- Light Source
- Tripod for your phone or camera for ideal stability
- Filter
- Backdrop
- Reflector
Go Through Our Actionable Lightbox Photography Tips
Light Source Options For Lightbox Photography Setup
You can easily find different options to light up your products. You can make the best use of lamps, special bulbs with particular color temperatures, studio light, and also sunlight. However, the best thing is to choose a dark room with no outside light source for shooting as you can completely control the light by utilizing your own lamps. It helps to get the proper color of the product.
You can also use a window with natural light nearby and attach a light kit that comes with a lightbox. In fact, it is light that defines the quality of an image. Lighting may be tough to set up, but when done correctly, it can transform a simple image into an eye-catching photograph.
Why Filter Is Essential For Photo lightbox Photography Setup?
The filter means when light passes through anything before it hits your product—for instance, a see-through curtain, sheet, or anything sheer and white. The walls of the lightbox work like a filter, so it’s built right in. Adding a lightbox with the best lighting setup can ideally transform photos from dim and lifeless to glowing and well-lit.
After capturing the product photo, you need a little editing work to brighten the background and make it even more attractive. Here are the best image editing tools that can help you.
Importance of Tripod in Photography
A good tripod can efficiently serve for many years, and you can conveniently find the best tripod for your needs. If you are using a camera for photographs, then set it to a low aperture and slow shutter speed. It allows you to get a wide depth of field and also keeps your entire item in focus. It is very important to stabilize the camera when shooting with a wide depth of field to avoid blurry images.
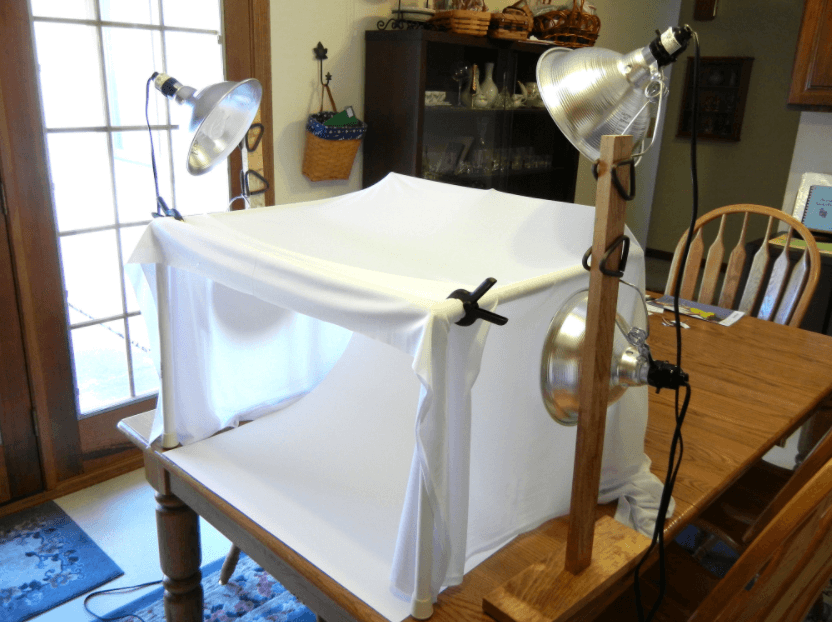
How to Setup the New Lightbox Studio
The first thing you need is to find a place where you can put everything and keep it there for the long term. If you are using a phone tripod with desktop height, then you need a large surface or a second table to facilitate the box and light. However, if you have a camera and a regular floor tripod, then you don’t need a second table. Let’s get started to set up the new lightbox studio:
- Set up a durable table for a lightbox and lights to sit on.
- Unfold your lightbox and assemble it.
- Add backdrop/cloth if available.
- Properly curve the cloth behind to avoid any beam in the shot.
- Set up lights on the right and left sides.
- Get the product and clean it properly. Remove any fingerprints or dust to avoid any appearance issues.
- Place in the center of the box on the curved backdrop.
- Put the camera on a tripod and get started.
Placement and Test Shots
After putting everything in place, it’s time to take some test shots to know how to use a lightbox. Place the phone or camera on a tripod in front of a table. Take a few photos and then move your tripod either closer or far away and then take more photos. Soon you will realize which angel is perfect for your needs.
Remember, you should place the product inside the lightbox and move it close, away, and also try different angles for the best results.
Camera Setup For Lightbox Photography
Set the camera safely on the tripod and use either a remote shutter release or a 2-second timer to ensure that the tripod remains steady. The tripod allows using a longer shutter speed with excellent results. Start by shooting in aperture priority mode with an ISO of 100. Select the aperture based on the appearance that you want to reach in the picture.
Wide apertures and selective blur work best with food photographs as they make them look appealing. A narrow aperture is ideal for capturing crafts and handmade goods to keep the undamaged item in focus. To avoid blue in the foreground, set the direction utilizing the part of the product that is nearest to the camera.
Post-processing Matters After Camera Shooting
You should retouch your images after capturing them to achieve a polished look. For beginners, it can be tough to get the right background and lighting. Retouching perfectly covers everything, such as from background removal to color correction, shadow addition, and mannequin removal. Though photo editing may take some time, you can get your desired results with it. We have already shared the best free photo editing tools for your convenience in the lightbox photography tips section above.
Note: Interested to know about Lighting Tips for Product Photography? Read here.
Frequently Asked Questions
Q1: What are the best practices for lightbox?
A1: Best practices for using a lightbox in photography involve selecting an appropriate size, diffusing the lighting for even illumination, using a tripod for stability, adjusting camera settings, and positioning the subject carefully. Controlling reflections, post-processing for enhancements, maintaining consistency, and experimenting with angles and backgrounds are also important. These practices help ensure high-quality, well-lit, and visually appealing photographs when using a lightbox.
Q2: How do you use a camera light box?
A2: To use a camera lightbox, set it up on a stable surface, place your subject inside, adjust the lighting, mount your camera on a tripod, focus, and capture the image. Review and edit as needed for the best results.
Q3: How do you take good pictures of a box?
A3: To take good pictures of a box, use even lighting to minimize shadows, choose a clean and uncluttered background, ensure the box is well-focused and framed, and consider using a tripod for stability. Additionally, adjust camera settings like ISO, aperture, and shutter speed to suit the lighting conditions and desired outcome.
Q4: Where do you put lights in a lightbox?
A4: In a lightbox, lights are typically placed on the sides or behind a diffusing surface to provide even and uniform illumination across the subject or object placed inside the box. This setup helps minimize shadows and ensures that the subject is well-lit from all angles for photography or display purposes.
Q5: What is the lightbox technique?
A5: The lightbox technique is a photography or design approach where a subject is placed on a translucent surface with lighting positioned underneath or behind it. This technique is used to create even, diffused lighting that minimizes shadows and enhances the subject’s appearance. It’s commonly used for product photography, macro photography, and tracing or drawing tasks.


