How to Make a Backdrop Stand for Photography! Photography, both amateur and professional, often necessitates a versatile backdrop stand to facilitate various shooting environments. A backdrop stand is a critical component, enabling photographers to create a tailored background for their subjects, enhancing the overall visual appeal and professionalism of the photographs. Building your backdrop stand offers customization options and cost-effectiveness, ensuring you have a tool that suits your specific requirements. In this comprehensive guide, we’ll delve into a step-by-step process to help you construct your backdrop stand for photography.
How to Make a Backdrop Stand for Photography
The Significance of a Backdrop Stand
A backdrop stand serves multiple purposes crucial to achieving exceptional photography:
Versatility: A backdrop stand allows you to switch between different backgrounds seamlessly, adding diversity and creativity to your shots.
Consistency: With a stable backdrop stand, you can maintain a consistent background throughout your photo session, avoiding distractions and maintaining a professional look.
Efficiency: Having a dedicated stand for your backdrops makes the setup process more efficient, saving time during shoots and allowing you to focus on capturing the perfect shot.
Materials and Tools Required
Before embarking on this DIY project, gather all the materials and tools you’ll need:
Materials:
PVC Pipes: These are lightweight, affordable, and customizable for constructing the frame.
Connectors: Various types of connectors such as elbows, tees, and crosses join the PVC pipes.
Backdrop Clips: Used to secure the backdrop material to the stand.
Backdrop Fabric: Choose a backdrop material like muslin, paper, or fabric based on your preferences and photography needs.
Measuring Tape: Essential for accurate measurements.
Hacksaw: To cut the PVC pipes to the desired lengths.
PVC Cement: Used to secure the connectors to the pipes.
Drill and Screws: For attaching backdrop clips to the stand.
Step-by-Step Guide to Building a Backdrop Stand
Follow these steps to construct a backdrop stand tailored to your photography requirements:
Step 1: Plan and Measure
Begin by planning the dimensions and size of the backdrop stand based on the typical backdrops you’ll use. Consider the height and width of the backdrops to determine the necessary dimensions for your stand.
Step 2: Cut the PVC Pipes
Using a hacksaw, cut the PVC pipes into appropriate lengths according to your measurements. The vertical pipes should match the backdrop’s height, and the horizontal pipes should match its width.
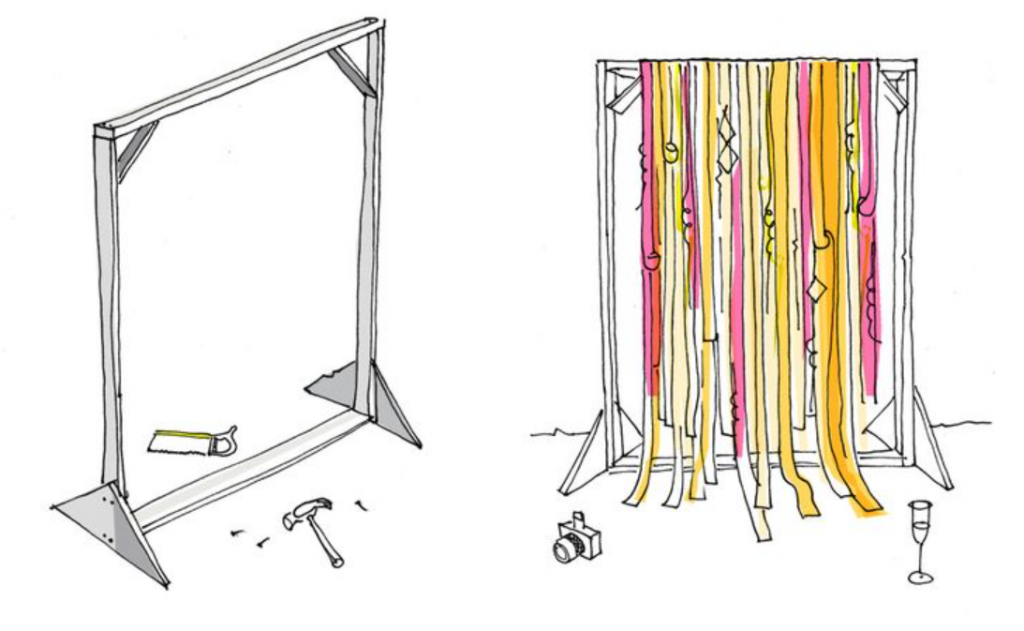
Step 3: Assemble the Frame
Connect the PVC pipes using the selected connectors to form the frame of the backdrop stand. Start by joining the base, then attach the vertical pipes and top bar (horizontal pipe). Ensure the connections are secure.
Step 4: Attach the Backdrop Clips
Drill holes into the top bar of the frame and attach the backdrop clips securely using screws. These clips will hold the backdrop material in place.
Step 5: Test the Stand
Test the backdrop stand to ensure it is stable and can hold the weight of the backdrop material. Make any necessary adjustments to ensure it is level and secure.
Step 6: Add the Backdrop
Hang your chosen backdrop material on the stand using the backdrop clips. Adjust the height and width of the stand to match the dimensions of your backdrop.
Tips for a Sturdy and Functional Backdrop Stand
Choose Quality Materials: Opt for durable PVC pipes and connectors that can withstand the weight of the backdrop and provide stability to the stand.
Consider Base Weight: If your backdrop stand seems unstable, consider adding weight to the base using sandbags or weighted containers to improve stability.
Secure Connectors Properly: Use PVC cement to securely attach the connectors to the pipes, ensuring a stable and sturdy frame.
Account for Storage and Portability: If storage and portability are essential, consider making the stand easily disassemblable for convenient transportation and storage.
Experiment and Customize: Feel free to modify the design based on your specific needs. You can add extra bars for multi-backdrop setups or incorporate wheels for mobility.
Conclusion
Creating your backdrop stand for photography is a rewarding and practical endeavour. It allows you to tailor the stand to your needs, offering a versatile tool to enhance your photography projects. By carefully following the steps outlined in this guide and considering the additional tips provided, you’ll be well on your way to constructing a backdrop stand that meets your requirements. With your DIY backdrop stand ready, you’ll have the flexibility to experiment with different backgrounds, elevate the quality of your images, and showcase your subjects in diverse and captivating settings. { "@context": "https://schema.org/", "@type": "HowTo", "name": "How to Make a Backdrop Stand for Photography", "description": "How to Make a Backdrop Stand for Photography! If you’re looking for a way to spruce up your photo shoots and make your backdrop look more professional, then a backdrop stand may be what you’re looking for. A backdrop stand can help you keep your backdrop in place while you take pictures or videos of your subjects, and it can also help you reduce wrinkles in the fabric.", "image": "https://photolightboxes.net/wp-content/uploads/2022/06/How-to-Make-a-Backdrop-Stand-for-Photography-680x350.png", "totalTime": "PT10M", "estimatedCost": { "@type": "MonetaryAmount", "currency": "USD", "value": "$10" }, "supply": [ { "@type": "HowToSupply", "name": "A Drill" }, { "@type": "HowToSupply", "name": "Screws" } ], "tool": [ { "@type": "HowToTool", "name": "A Saw" }, { "@type": "HowToTool", "name": "Sand Paper" } ], "step": [ { "@type": "HowToStep", "text": "Making a backdrop stand for photography is a relatively simple process that can be completed in a few hours with basic supplies. You’ll need \n\nPiece of Wood 2×4 feet\n\nA Drill\n\nScrews\n\nA Saw\n\nSand Paper\n\nThe size of the wood can be increased or decreased depending on the desired height of the backdrop stand.", "image": "https://photolightboxes.net/wp-content/uploads/2022/06/How-to-Make-a-Backdrop-Stand-for-Photography-680x350.png", "name": "What You’ll Need", "url": "https://photolightboxes.net/how-to-make-a-backdrop-stand-for-photography/#Step_1_What_Youll_Need" }, { "@type": "HowToStep", "text": "When you are choosing a backdrop stand for photography, the first step is to determine the size of the stand that is needed. This will depend on the size of your backdrop and the space you have to work with. If you have a lot of space, then you can choose a larger stand, but if you are working in a smaller space, then you will need to choose a smaller stand. \n\nIt is also important to consider the weight of the stand. If you are going to be moving it around a lot, then you will want to choose a lighter stand. However, if you plan on leaving it in one place, then a heavier stand would be better. \n\nFinally, consider the price. You don’t want to spend a lot of money on a backdrop stand if you don’t have to, but you also don’t want something that is going to fall apart after one use.", "image": "https://photolightboxes.net/wp-content/uploads/2022/06/How-to-Make-a-Backdrop-Stand-for-Photography-680x350.png", "name": "Determine the Size of the Stand", "url": "https://photolightboxes.net/how-to-make-a-backdrop-stand-for-photography/#Step_2_Determine_the_Size_of_the_Stand" }, { "@type": "HowToStep", "text": "The next step is to build a frame that is the same size as determined in the first step. Start by cutting the wood into pieces that will form the frame. You’ll want two identical pieces that are the same length and width, and two pieces that are the same height. Next, drill holes in each corner of the frame pieces so that they can be attached together.", "image": "https://photolightboxes.net/wp-content/uploads/2022/06/How-to-Make-a-Backdrop-Stand-for-Photography-680x350.png", "name": "Build a Frame", "url": "https://photolightboxes.net/how-to-make-a-backdrop-stand-for-photography/#Step_3_Build_a_Frame" }, { "@type": "HowToStep", "text": "Once the frame has been built, it is time to install the crossbars. Installing the crossbars is the next step in setting up your backdrop stand. These crossbars will hold up the backdrop and keep it taut, ensuring that your photos look their best. After you have installed the crossbars, you can then add on the clamps to secure your backdrop in place.", "image": "https://photolightboxes.net/wp-content/uploads/2022/06/How-to-Make-a-Backdrop-Stand-for-Photography-680x350.png", "name": "Install the Crossbars", "url": "https://photolightboxes.net/how-to-make-a-backdrop-stand-for-photography/#Step_4_Install_the_Crossbars" }, { "@type": "HowToStep", "text": "The final step is to attach the frame to the legs of the stand. The stand usually has a lip around the top that will fit into a groove on the back of the frame. There are also usually screws or bolts that can be used to secure the frame in place. Be sure to use all of them for maximum stability. Once it is attached, you’re ready to start shooting!", "image": "https://photolightboxes.net/wp-content/uploads/2022/06/Attach-the-Frame-to-the-Legs-of-the-Stand-1024x589.png", "name": "Attach the Frame to the Legs of the Stand", "url": "https://photolightboxes.net/how-to-make-a-backdrop-stand-for-photography/#Step_5_Attach_the_Frame_to_the_Legs_of_the_Stand" } ] }


