We led Light Box Display: How to Make One! We all want our images to look their best, whether we’re working as professionals or just taking them for leisure. How can we achieve that? Creating and displaying them in a stunning lightbox display is one way, though! In this post, I’ll demonstrate how simple it is to make your LED photo lightbox display with basic home objects.
The best approach to display your photos is in a lightbox display. The fact that this kind of photo display is so simple to make is its best feature. It’s not too tricky and a terrific method to cut expenditures on lighting or if you want something different for your home.
How to Make Led Light Box Display
I created a low-cost lightbox for myself using some readily available components. An RGB LED strip and other stuff lying around or purchased for less than market value came to only $20!
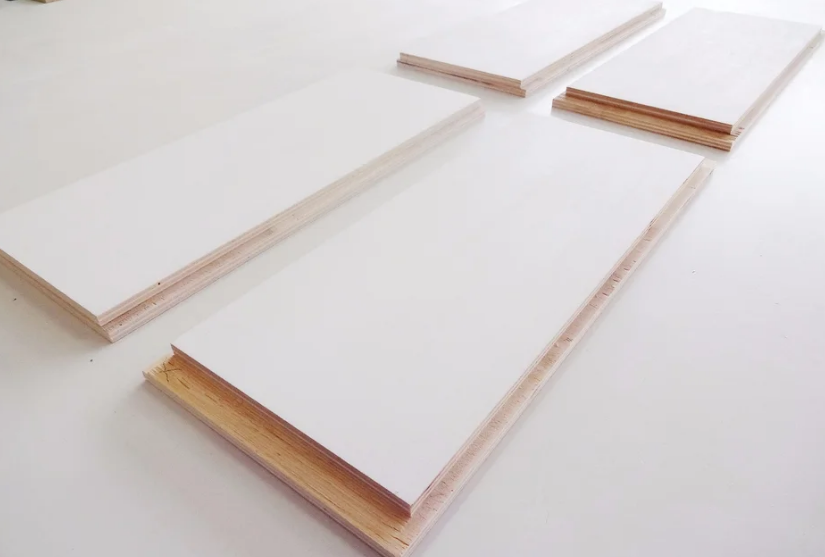
Step 1: Materials
To construct the LED Light Box Display, these materials are necessary.
- plywood (I used 15mm birch ply)
- flexible LED strip
- 1/4″ vinyl-faced MDF
- sheet of dollar-store foamboard
- woodworking tools
- wood glue
- Hot glue
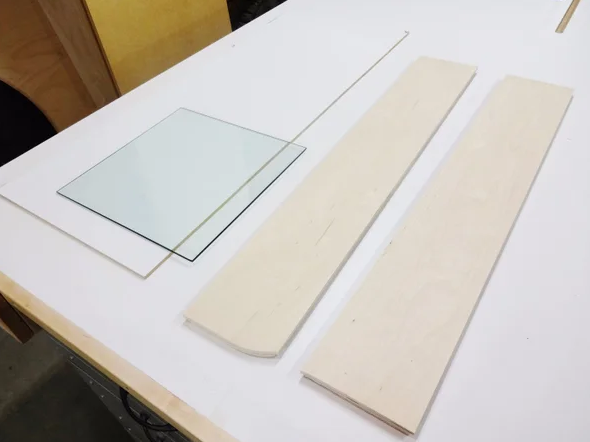
Tempered glass is a far better alternative for the top of your desk than any other type of material. After digging, I discovered two 14″ x 14″ panes for just $0.50 each, brightening my day!
This lightbox’s glass is unique since it was created from shattered computer monitor glass. The pane is more expensive than other solutions because of the type of plastic, but if you have an old printer or scanner lying around, that might also work!
Step 2: Box Sides
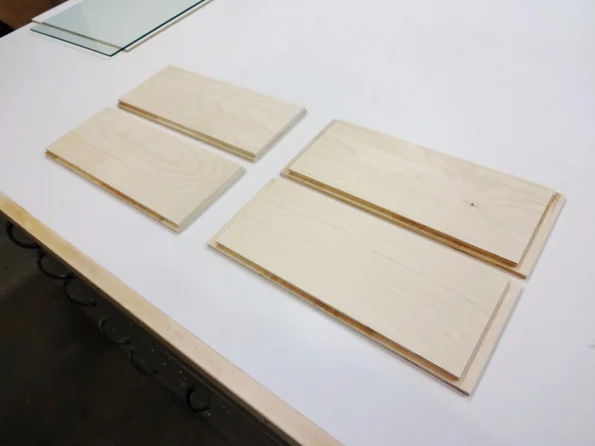
I used a finer finish polish and made the box’s sides 6 inches tall to give it a more upscale appearance. I cut rabbets (or “rebates”) along the top edge of the glass to keep it in place and another pair where the glass meets the MDF panel, using a router positioned within the table. Two opposing joints were used at the corners, and the length of the sides was constructed to fit a particular pane.
Step 3: Dry Fit
The box’s sides were dry-fitted to ensure that my glass would fit properly. To place panels or windows on an outside wall without any frameworks underneath, I had to cut just a little deeper into each top Rabbet. This keeps things looking neater.
Before you put the box together, it’s a good idea to double-check your work. Instead of waiting until it’s too late, you might discover that one of those components has to be modified or replaced because it needs to fit better.
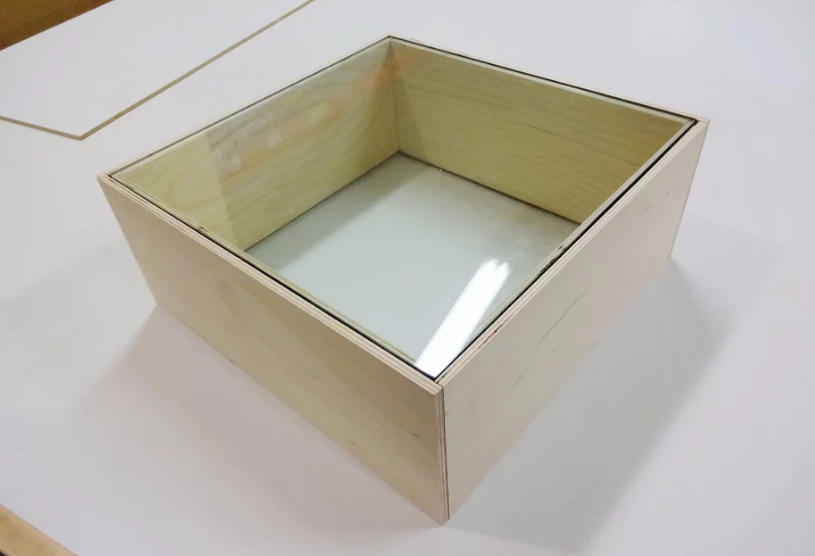
Step 4: Paint Inner Walls
The interior walls were freshly painted white with spray paint, giving the space a brand-new appearance.
Step 5: Assemble Box
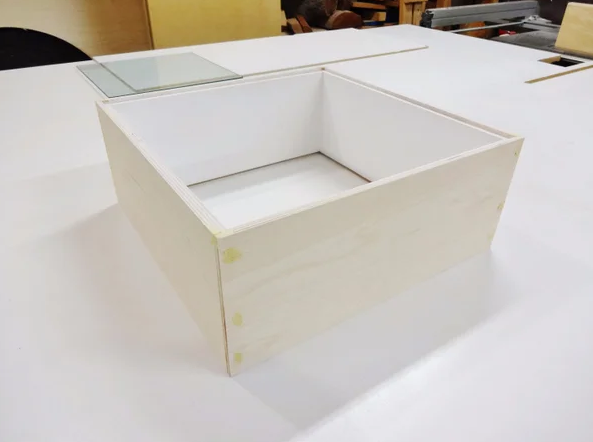
This project requires wood glue and brads to assemble all of its components; once they’re dry (of course), you fill in any exposed holes where putty was placed before sanding smooth once more to allow spray lacquer coats to be added to your finished product!
Step 6: Glue in Glass
I cut a little piece of glass for the corner, adhered it with E-6000, cleaned the glue with soap and water (or Goo Gone), and then positioned it. Less than an hour passed before the glue hardened all four sides, keeping them secure!
Step 7: Foamboard to Diffuse Light
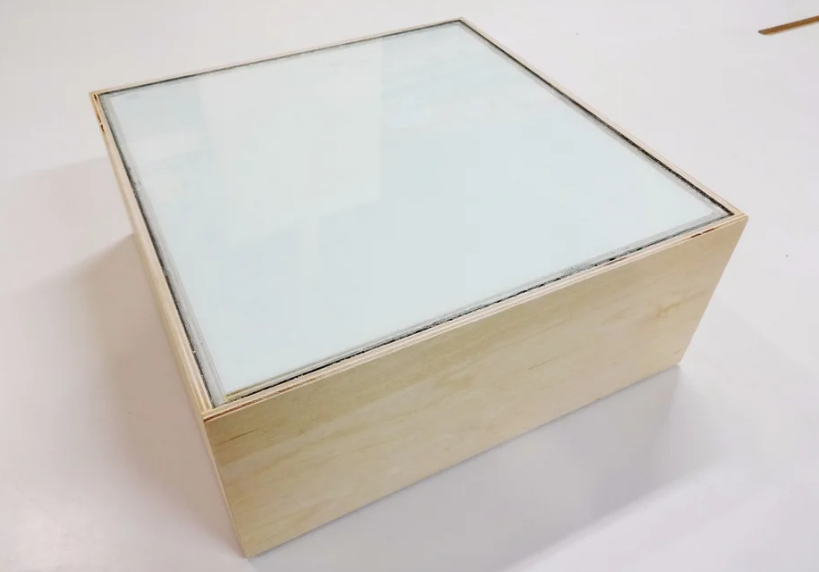
Ultimately, I discovered that inexpensive foamboard was effective for evenly dispersing light. Use a sort of board with thin paper on it, please! I could see out of my inside glass window the entire while this repair was underway because of one piece that was precisely cut to fit against it.
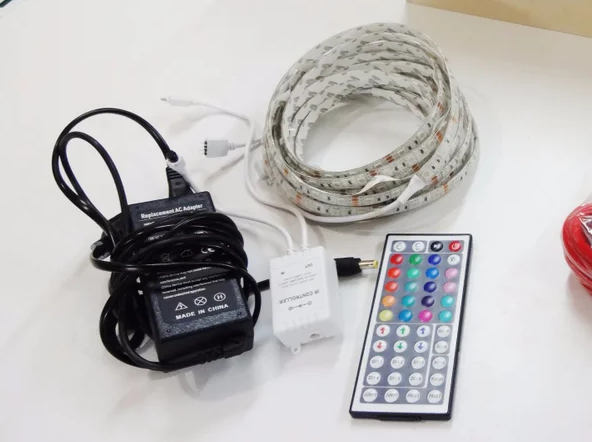
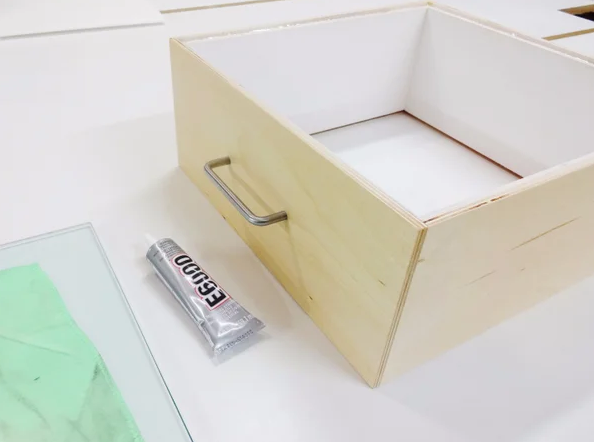
Step 8: Add Light Power Boxes
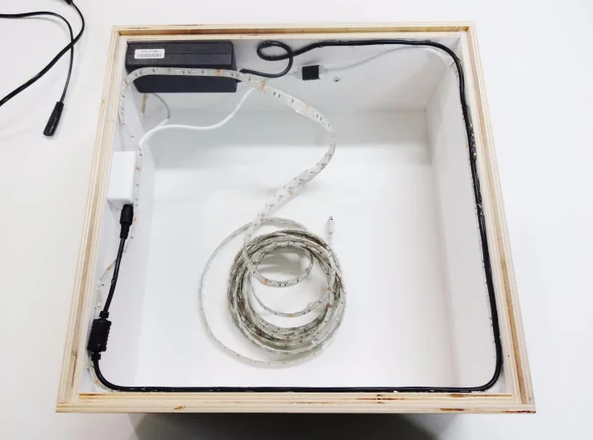
Finding the ideal lighting for your house is challenging. Have a set of LED strips that emit an inconsistent light? Do you have a lighting fixture that needs new bulbs but are unsure you need to know which ones will perform best? Take note of this DIYer who replaced their SECOND cable set with a strip of bright and colorful LEDs if you’re having difficulties finding something suitable.
Step 9: Affix LED Strip
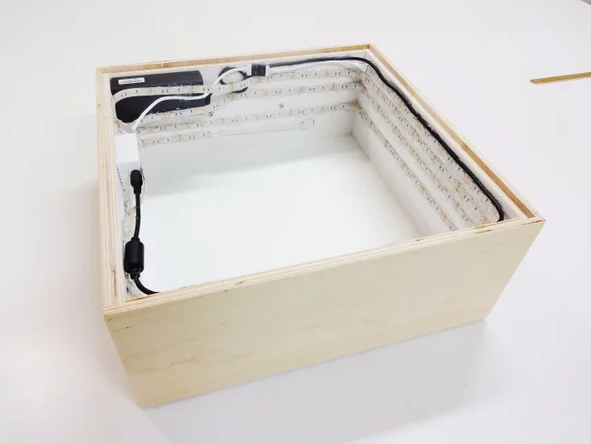
I used hot glue to keep the LED strip around the wall. I reinforced every point where they met by adding a ton of the gooey liquid that clings to surfaces and other objects because the glue was a little dubious.
Step 10: Bottom Panel
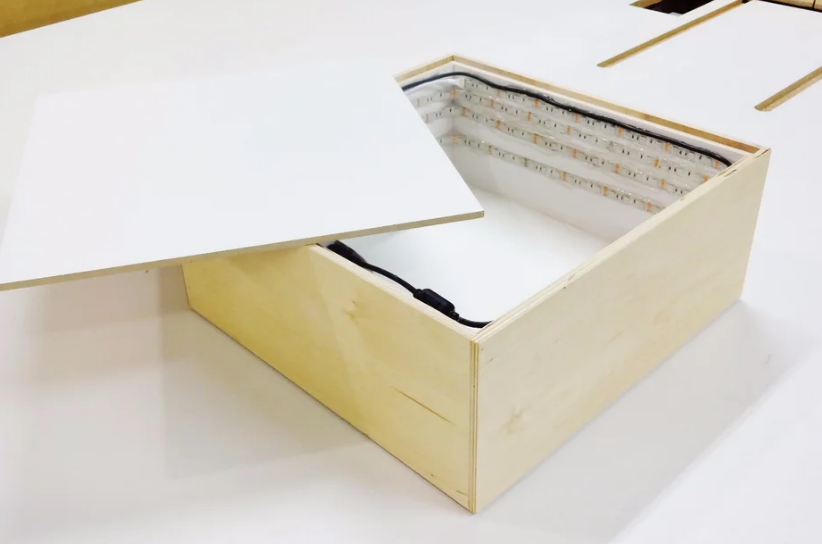
With the white side facing out, the bottom panel is screwed in place after being cut to size. { "@context": "https://schema.org/", "@type": "HowTo", "name": "How to Make Led Light Box Display", "description": "How to Make Led Light Box Display! Whether you’re a professional photographer or just someone who likes to snap photos for fun, we all want our pictures to look their best. How can we do that? Well, one way is by creating and displaying them in an amazing lightbox display! In this post, I will show you how easy it is to make your own led photo lightbox display using common household items.", "image": "https://photolightboxes.net/wp-content/uploads/2021/12/How-to-Make-Led-Light-Box-Display-680x350.png", "totalTime": "PT10M", "estimatedCost": { "@type": "MonetaryAmount", "currency": "USA", "value": "$10" }, "supply": [ { "@type": "HowToSupply", "name": "plywood" }, { "@type": "HowToSupply", "name": "flexible LED strip" }, { "@type": "HowToSupply", "name": "1/4\" vinyl-faced MDF" } ], "tool": [ { "@type": "HowToTool", "name": "woodworking tools" }, { "@type": "HowToTool", "name": "wood glue" }, { "@type": "HowToTool", "name": "Hot glue" } ], "step": [ { "@type": "HowToStep", "text": "Tempered glass is a much better option than any other material for the top of your desk. I was able to find two 14″ x 14″ panes at only $0.50 each with some searching, which made my day!\nThe glass in this lightbox is special because it’s made from panes of broken computer monitors. The type of material also makes the pane more expensive than other options, but if you have an old printer or scanner laying around then that might work too!", "image": "https://photolightboxes.net/wp-content/uploads/2021/12/Materials.png", "name": "STEP 1: MATERIALS", "url": "https://photolightboxes.net/how-to-make-led-light-box-display/#Step_1_Materials" }, { "@type": "HowToStep", "text": "I made my box sides 6″ tall and used a finer finish polish to make it more elegant looking. Using a router mounted in the table, I cut rabbets (or “rebates”) along the top edge to hold the glass and another pair down where it meets MDF panel. The length of sides was made as needed for a specific pane with two opposing joints having just enough added strength at corners!", "image": "https://photolightboxes.net/wp-content/uploads/2021/12/Box-Sides.png", "name": "STEP 2: BOX SIDES", "url": "https://photolightboxes.net/how-to-make-led-light-box-display/#Step_2_Box_Sides" }, { "@type": "HowToStep", "text": "The sides of the box were dry fit to check that my glass would fit correctly. In order for me, I had cut just a little deeper into each top Rabbet so there is enough room when installing panels or windows on an outside wall without any frameworks underneath this keeps things cleaner! It’s not a bad idea to check your work before you assemble the box. You might find that one of those parts doesn’t fit right and need to be adjusted or replaced, rather than when it’s too late!", "image": "https://photolightboxes.net/wp-content/uploads/2021/12/Dry-Fit.png", "name": "STEP 3: DRY FIT", "url": "https://photolightboxes.net/how-to-make-led-light-box-display/#Step_3_Dry_Fit" }, { "@type": "HowToStep", "text": "The inside walls were given a fresh coat of white spray paint, giving the room an all-new look.", "image": "https://photolightboxes.net/wp-content/uploads/2021/12/Paint-Inner-Walls.png", "name": "STEP 4: PAINT INNER WALLS", "url": "https://photolightboxes.net/how-to-make-led-light-box-display/#Step_4_Paint_Inner_Walls" }, { "@type": "HowToStep", "text": "The construction process for this project entails using wood glue as well as brads to assemble all its parts; once they’re dry (of course), you fill in any exposed holes through which putty was applied before sanding smooth once more – at last allowing spray lacquer coats onto your new creation!", "image": "https://photolightboxes.net/wp-content/uploads/2021/12/Assemble-Box.png", "name": "STEP 5: ASSEMBLE BOX", "url": "https://photolightboxes.net/how-to-make-led-light-box-display/#Step_5_Assemble_Box" }, { "@type": "HowToStep", "text": "I cut a small corner piece of glass I glued it into place with E-6000 and removed the residue with soap and water (or Goo Gone) then placed it into place. The glue along all four edges held fast for less than an hour before curing completely!", "image": "https://photolightboxes.net/wp-content/uploads/2021/12/Glue-in-Glass.png", "name": "STEP 6: GLUE IN GLASS", "url": "https://photolightboxes.net/how-to-make-led-light-box-display/#Step_6_Glue_in_Glass" }, { "@type": "HowToStep", "text": "In the end, I found that cheap foamboard worked well for properly diffusing light. Make sure you use a type of board with thin paper on it! One-piece was cut to perfectly fit against my inside glass window and allowed me maximum visibility during this project’s duration.", "image": "https://photolightboxes.net/wp-content/uploads/2021/12/Foamboard-to-Diffuse-Light.png", "name": "STEP 7: FOAMBOARD TO DIFFUSE LIGHT", "url": "https://photolightboxes.net/how-to-make-led-light-box-display/#Step_7_Foamboard_to_Diffuse_Light" }, { "@type": "HowToStep", "text": "It’s hard to find the perfect light for your home. Do you have a set of LED strips that cast an uneven glow, or perhaps some type of lighting fixture in need of new bulbs but unsure which ones will work best? If you’re having trouble finding something good enough just take note from this DIYer who replaced their SECOND cord set with a strip-of bright and colorful LEDs!", "image": "https://photolightboxes.net/wp-content/uploads/2021/12/Add-Light-Power-Boxes.png", "name": "STEP 8: ADD LIGHT POWER BOXES", "url": "https://photolightboxes.net/how-to-make-led-light-box-display/#Step_8_Add_Light_Power_Boxes" }, { "@type": "HowToStep", "text": "I secured the LED strip with hot glue to keep it in place around the wall. The adhesive was a little suspect, so I reinforced every inch of where they meet by applying copious amounts of the gooey substance that bonds between pieces and surfaces alike!", "image": "https://photolightboxes.net/wp-content/uploads/2021/12/Affix-LED-Strip.png", "name": "STEP 9: AFFIX LED STRIP", "url": "https://photolightboxes.net/how-to-make-led-light-box-display/#Step_9_Affix_LED_Strip" }, { "@type": "HowToStep", "text": "The bottom panel is cut to fit and screwed in place with the white side facing out.", "image": "https://photolightboxes.net/wp-content/uploads/2021/12/Bottom-Panel.png", "name": "STEP 10: BOTTOM PANEL", "url": "https://photolightboxes.net/how-to-make-led-light-box-display/#Step_10_Bottom_Panel" }, { "@type": "HowToStep", "text": "To make my sliding refrigerator door work, I attached a piece of velcro to the bottom corners and used adhesive-backed foam.", "image": "https://photolightboxes.net/wp-content/uploads/2021/12/Finishing-Touches.png", "name": "STEP 11: FINISHING TOUCHES", "url": "https://photolightboxes.net/how-to-make-led-light-box-display/#Step_11_Finishing_Touches" } ] }
Step 11: Finishing Touches
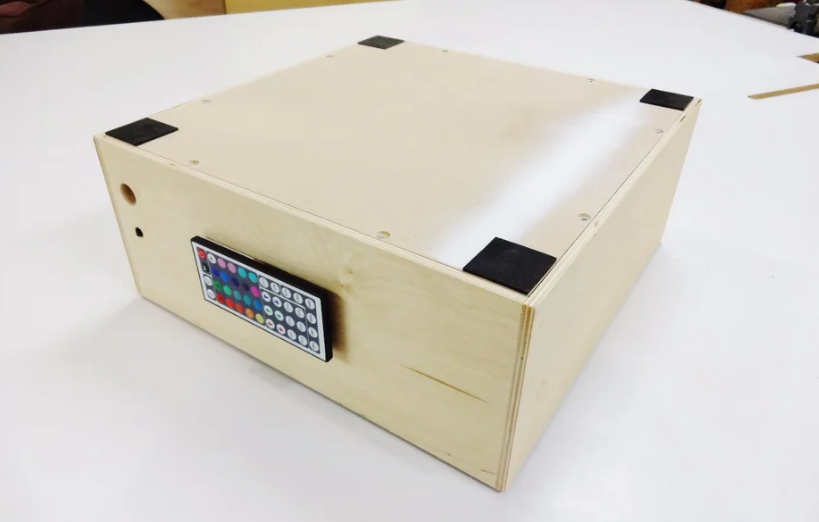
I utilized foam with an adhesive-backed backing and velcro fastened to the bottom corners to make my sliding refrigerator door functional.
Thank you for reading this post. 🙂
Note: Interested to know about LightBox Photography Tips?
Q1: What materials are typically needed for an LED light box display?
A1: You’ll typically need an acrylic sheet, LED light strips, a power supply, a frame or enclosure, and various tools like a drill and screws.
Q2: How do you create an even light distribution in an LED light box display?
A2: Attach the LED light strips evenly along the edges or behind the acrylic sheet to ensure even illumination.
Q3: What’s the purpose of using an acrylic sheet in an LED light box display?
A3: The acrylic sheet is the display surface and diffuses the light from the LEDs, providing a uniform and visually appealing glow.
Q4: How can you customize the appearance of an LED light box display?
A4: You can customize the appearance by choosing different LED strip colours, adjusting the brightness, and adding graphics or designs to the acrylic sheet.
Q5: Are there any safety precautions to consider when working with LED light box displays?
A5: Yes, be cautious with electrical connections, avoid overloading the power supply, and ensure that the LED strips are installed securely to prevent any safety hazards.


